Flutterのルーティング入門(Navigator と go_router の使い分け) の次に、実際の画面から外部データを取りに行く入口が REST API 通信です。ここで止まりやすいのは http.get の書き方そのものではありません。ローカルの API をどう用意するか、Android Emulator からどの URL を叩くか、失敗したときにどこで止めるかが曖昧なまま書き始めるところにあります。この記事では json-server を使って Docker なしで API を立て、Flutter から GET / POST、JSON デシリアライズ、一覧表示、エラー処理までを最小構成で確認します。
1. ゴールと非対象
対象読者
- Flutter の環境構築、Dart 入門、基本 UI、一覧 UI、ルーティング入門までは終わった人
- Flutter から API を呼びたいが、何をどこまで用意すればよいかまだ曖昧な人
httpパッケージで JSON 通信を始め、失敗時の見せ方も最初に揃えたい人
この記事で到達する状態
json-serverでローカル API を起動できるhttpパッケージでGET /shipmentsとPOST /shipmentsを呼べる- JSON を Dart の Model に変換できる
- 一覧表示、再読込、登録後の反映を最小構成で確認できる
statusCode、接続失敗、タイムアウト、JSON 形式不正の切り分け方を説明できる
非対象
- Riverpod / Bloc などの状態管理ライブラリ
- JWT やログイン状態保持
- ページング、検索条件、無限スクロール
- Repository パターンやファイル分割の設計
- 本番 API サーバーや HTTPS 証明書の話
今回は通信の入口を作るところに絞ります。状態管理や認証は後続記事へ回し、まずは「ローカル API を呼んで、失敗を UI で受け止める」最小形を固めます。
2. まずは通信全体の流れを掴む
今回の流れは次の 4 層です。
flowchart LR
  A[Flutter 画面] --> B[ShipmentApiClient]
  B -->|GET /shipments| C[json-server]
  B -->|POST /shipments| C
  C --> D[db.json]
  B --> E{結果を判定}
  E -->|200 / 201| F[一覧更新]
  E -->|statusCode異常| G[エラー表示]
  E -->|接続失敗 / timeout| G
  E -->|JSON形式不正| G
先に図で見ておくと、エラー処理の置き場が分かりやすくなります。
- API サーバー未起動時は接続失敗
- URL が誤っている場合は
404や500 - JSON の形が違う場合はデシリアライズで停止
- タイムアウトは接続できていても発生する
見るべき点は「通信に成功したか」だけではありません。どの層で失敗したかを分けておくと、読者が次に確認する場所をすぐ特定できます。
3. 動かす環境を整える
3-1. Flutter プロジェクトを作る
環境構築がまだの場合は Windows 11で始めるFlutter開発環境 を先に参照してください。
次のコマンドでプロジェクトを作成します。
flutter create my_api_app
cd my_api_app
3-2. エミュレーターを起動する
利用可能なエミュレーター一覧を確認します。
flutter emulators表示されたIDを指定して起動します。
flutter emulators --launch <emulator_id>3-3. json-server でローカル API を立てる
Flutter から呼び出す API をローカルで用意します。今回は json-server を使います。
my_api_app/ に db.json を作成します。内容は次の通りです。
このファイルは、一覧取得と登録で使う最小データを json-server に渡すための定義です。注目点は、Flutter 側で扱う Shipment モデルと同じキー構成をここで固定していることです。
{
  "shipments": [
    {
      "id": 1,
      "code": "S-1001",
      "customer": "東京商事",
      "status": "未出荷"
    },
    {
      "id": 2,
      "code": "S-1002",
      "customer": "大阪物産",
      "status": "ピッキング中"
    },
    {
      "id": 3,
      "code": "S-1003",
      "customer": "名古屋販売",
      "status": "確認待ち"
    }
  ]
}
コードのポイント
① shipments 配列がそのまま API の一覧レスポンスになる
{
  "shipments": [
    {
      "id": 1,
      "code": "S-1001",
      "customer": "東京商事",
      "status": "未出荷"
    }
  ]
}
json-server では shipments 配列がそのまま GET /shipments のレスポンスになります。Flutter 側は配列を前提に読んでいるため、ここをオブジェクトへ変えると FormatException を確認できる構成です。
② 各要素のキー名を Flutter 側のモデルと揃えている
{
  "id": 1,
  "code": "S-1001",
  "customer": "東京商事",
  "status": "未出荷"
}
id code customer status の 4 キーが、後段の Shipment.fromJson() で必須値として読まれます。ローカル API を先にこの形へ揃えておくと、通信確認とモデル変換の切り分けがしやすくなります。
my_api_app/ ディレクトリで次のコマンドを実行します。
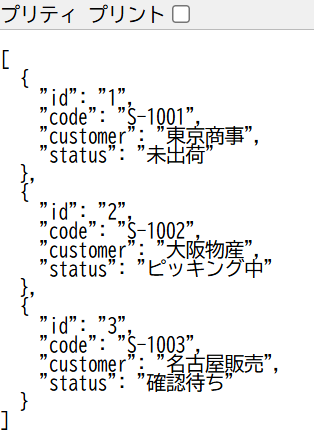
npx json-server --watch db.json --port 3000起動後にブラウザで http://localhost:3000/shipments を開けば、JSON 配列を確認できます。
Android Emulator からホスト PC の localhost へは、そのままでは届きません。
- Android Emulator:
http://10.0.2.2:3000 - Windows デスクトップ実行、iOS Simulator、Web:
http://localhost:3000
今回のサンプルコードでは、この違いを baseUrl の切り替えで吸収します。localhost のまま進めると Android Emulator だけ接続失敗になるので、ここは早めに押さえたほうが安全です。
3-4. http パッケージを追加する
プロジェクト直下で次のコマンドを実行します。
flutter pub add http4. 一覧取得と登録を lib/main.dart にまとめる
lib/main.dart は次の内容で作成します。
このファイルは、一覧取得、登録、再読込、エラー表示までを 1 画面で確認する最小サンプルです。注目点は、ShipmentApiClient に通信を寄せ、画面側は状態表示と入力操作へ集中していることです。
import 'dart:async';
import 'dart:convert';

import 'package:flutter/foundation.dart';
import 'package:flutter/material.dart';
import 'package:http/http.dart' as http;

void main() {
  runApp(const MyApp());
}

class MyApp extends StatelessWidget {
  const MyApp({super.key});

  @override
  Widget build(BuildContext context) {
    return MaterialApp(
      title: 'Flutter REST API sample',
      theme: ThemeData(
        colorScheme: ColorScheme.fromSeed(seedColor: Colors.teal),
      ),
      home: const ShipmentPage(),
    );
  }
}

class ApiException implements Exception {
  const ApiException(this.message);

  final String message;

  @override
  String toString() => message;
}

class Shipment {
  const Shipment({
    required this.id,
    required this.code,
    required this.customer,
    required this.status,
  });

  final int id;
  final String code;
  final String customer;
  final String status;

  factory Shipment.fromJson(Map<String, dynamic> json) {
    final id = json['id'];
    final code = json['code'];
    final customer = json['customer'];
    final status = json['status'];

    if (id == null || code == null || customer == null || status == null) {
      throw const FormatException('shipment の必須キーが不足しています。');
    }

    return Shipment(
      id: _parseId(id),
      code: code.toString(),
      customer: customer.toString(),
      status: status.toString(),
    );
  }

  Map<String, dynamic> toCreateJson() {
    return {
      'code': code,
      'customer': customer,
      'status': status,
    };
  }

  static int _parseId(Object value) {
    if (value is int) {
      return value;
    }

    if (value is num) {
      return value.toInt();
    }

    return int.parse(value.toString());
  }
}

class ShipmentApiClient {
  ShipmentApiClient({http.Client? client}) : _client = client ?? http.Client();

  final http.Client _client;

  String get baseUrl {
    if (kIsWeb) {
      return 'http://localhost:3000';
    }

    if (defaultTargetPlatform == TargetPlatform.android) {
      return 'http://10.0.2.2:3000';
    }

    return 'http://localhost:3000';
  }

  Future<List<Shipment>> fetchShipments() async {
    try {
      final response = await _client
          .get(Uri.parse('$baseUrl/shipments'))
          .timeout(const Duration(seconds: 5));

      if (response.statusCode != 200) {
        throw ApiException(
          '一覧取得に失敗しました。statusCode: ${response.statusCode}',
        );
      }

      final decoded = jsonDecode(utf8.decode(response.bodyBytes));

      if (decoded is! List) {
        throw const FormatException('配列 JSON を期待しました。');
      }

      return decoded
          .map((item) => Shipment.fromJson(item as Map<String, dynamic>))
          .toList();
    } catch (error) {
      throw _normalizeError(error);
    }
  }

  Future<Shipment> createShipment({
    required String code,
    required String customer,
  }) async {
    try {
      final response = await _client
          .post(
            Uri.parse('$baseUrl/shipments'),
            headers: {'Content-Type': 'application/json; charset=UTF-8'},
            body: jsonEncode(
              Shipment(
                id: 0,
                code: code,
                customer: customer,
                status: '未出荷',
              ).toCreateJson(),
            ),
          )
          .timeout(const Duration(seconds: 5));

      if (response.statusCode != 201) {
        throw ApiException(
          '登録に失敗しました。statusCode: ${response.statusCode}',
        );
      }

      final decoded = jsonDecode(utf8.decode(response.bodyBytes));

      if (decoded is! Map<String, dynamic>) {
        throw const FormatException('オブジェクト JSON を期待しました。');
      }

      return Shipment.fromJson(decoded);
    } catch (error) {
      throw _normalizeError(error);
    }
  }

  void dispose() {
    _client.close();
  }

  ApiException _normalizeError(Object error) {
    if (error is ApiException) {
      return error;
    }

    if (error is TimeoutException) {
      return const ApiException(
        '通信がタイムアウトしました。json-server が起動しているか確認してください。',
      );
    }

    if (error is http.ClientException) {
      return const ApiException(
        'API へ接続できません。json-server の起動と、Android Emulator では 10.0.2.2 を使っているかを確認してください。',
      );
    }

    if (error is FormatException) {
      return ApiException(
        'JSON を読み取れませんでした。db.json の構造を確認してください。詳細: $error',
      );
    }

    return ApiException('予期しないエラーが発生しました。詳細: $error');
  }
}

class ShipmentPage extends StatefulWidget {
  const ShipmentPage({super.key});

  @override
  State<ShipmentPage> createState() => _ShipmentPageState();
}

class _ShipmentPageState extends State<ShipmentPage> {
  final _codeController = TextEditingController();
  final _customerController = TextEditingController();
  late final ShipmentApiClient _apiClient;

  List<Shipment> _shipments = const [];
  String? _loadError;
  bool _isLoading = true;
  bool _isSubmitting = false;

  @override
  void initState() {
    super.initState();
    _apiClient = ShipmentApiClient();
    _loadShipments();
  }

  @override
  void dispose() {
    _apiClient.dispose();
    _codeController.dispose();
    _customerController.dispose();
    super.dispose();
  }

  Future<void> _loadShipments() async {
    setState(() {
      _isLoading = true;
      _loadError = null;
    });

    try {
      final shipments = await _apiClient.fetchShipments();

      if (!mounted) {
        return;
      }

      setState(() {
        _shipments = shipments;
      });
    } catch (error) {
      if (!mounted) {
        return;
      }

      setState(() {
        _loadError = error.toString();
      });
    } finally {
      if (!mounted) {
        return;
      }

      setState(() {
        _isLoading = false;
      });
    }
  }

  Future<void> _submit() async {
    final code = _codeController.text.trim();
    final customer = _customerController.text.trim();

    if (code.isEmpty || customer.isEmpty) {
      ScaffoldMessenger.of(context).showSnackBar(
        const SnackBar(content: Text('出荷番号と取引先名を入力してください。')),
      );
      return;
    }

    setState(() {
      _isSubmitting = true;
    });

    try {
      final created = await _apiClient.createShipment(
        code: code,
        customer: customer,
      );

      if (!mounted) {
        return;
      }

      setState(() {
        _shipments = [created, ..._shipments];
        _codeController.clear();
        _customerController.clear();
      });

      ScaffoldMessenger.of(context).showSnackBar(
        SnackBar(content: Text('${created.code} を登録しました。')),
      );
    } catch (error) {
      if (!mounted) {
        return;
      }

      ScaffoldMessenger.of(context).showSnackBar(
        SnackBar(content: Text(error.toString())),
      );
    } finally {
      if (!mounted) {
        return;
      }

      setState(() {
        _isSubmitting = false;
      });
    }
  }

  @override
  Widget build(BuildContext context) {
    return Scaffold(
      appBar: AppBar(
        title: const Text('出荷一覧 API サンプル'),
        actions: [
          IconButton(
            onPressed: _isLoading ? null : _loadShipments,
            icon: const Icon(Icons.refresh),
            tooltip: '再読込',
          ),
        ],
      ),
      body: RefreshIndicator(
        onRefresh: _loadShipments,
        child: ListView(
          physics: const AlwaysScrollableScrollPhysics(),
          padding: const EdgeInsets.all(16),
          children: [
            _InfoCard(baseUrl: _apiClient.baseUrl),
            const SizedBox(height: 16),
            TextField(
              controller: _codeController,
              decoration: const InputDecoration(
                labelText: '出荷番号',
                border: OutlineInputBorder(),
                hintText: 'S-2001',
              ),
            ),
            const SizedBox(height: 12),
            TextField(
              controller: _customerController,
              decoration: const InputDecoration(
                labelText: '取引先名',
                border: OutlineInputBorder(),
                hintText: '福岡商店',
              ),
            ),
            const SizedBox(height: 12),
            FilledButton.icon(
              onPressed: _isSubmitting ? null : _submit,
              icon: _isSubmitting
                  ? const SizedBox(
                      width: 18,
                      height: 18,
                      child: CircularProgressIndicator(strokeWidth: 2),
                    )
                  : const Icon(Icons.add),
              label: Text(_isSubmitting ? '登録中...' : 'POST で登録する'),
            ),
            const SizedBox(height: 24),
            Text(
              '出荷一覧',
              style: Theme.of(context).textTheme.titleLarge,
            ),
            const SizedBox(height: 12),
            if (_isLoading)
              const Padding(
                padding: EdgeInsets.symmetric(vertical: 48),
                child: Center(child: CircularProgressIndicator()),
              )
            else if (_loadError != null)
              _ErrorPanel(
                message: _loadError!,
                onRetry: _loadShipments,
              )
            else if (_shipments.isEmpty)
              const _EmptyPanel()
            else
              ..._shipments.map((shipment) => _ShipmentCard(shipment: shipment)),
          ],
        ),
      ),
    );
  }
}

class _InfoCard extends StatelessWidget {
  const _InfoCard({required this.baseUrl});

  final String baseUrl;

  @override
  Widget build(BuildContext context) {
    return Card(
      child: Padding(
        padding: const EdgeInsets.all(16),
        child: Column(
          crossAxisAlignment: CrossAxisAlignment.start,
          children: [
            Text(
              '接続先',
              style: Theme.of(context).textTheme.titleMedium,
            ),
            const SizedBox(height: 8),
            Text(baseUrl),
            const SizedBox(height: 8),
            const Text(
              'Android Emulator では 10.0.2.2、その他のローカル実行では localhost を使います。',
            ),
          ],
        ),
      ),
    );
  }
}

class _ShipmentCard extends StatelessWidget {
  const _ShipmentCard({required this.shipment});

  final Shipment shipment;

  @override
  Widget build(BuildContext context) {
    return Card(
      margin: const EdgeInsets.only(bottom: 12),
      child: ListTile(
        leading: CircleAvatar(child: Text('${shipment.id}')),
        title: Text(shipment.code),
        subtitle: Text('${shipment.customer} / ${shipment.status}'),
      ),
    );
  }
}

class _ErrorPanel extends StatelessWidget {
  const _ErrorPanel({required this.message, required this.onRetry});

  final String message;
  final Future<void> Function() onRetry;

  @override
  Widget build(BuildContext context) {
    return Card(
      color: Colors.red.shade50,
      child: Padding(
        padding: const EdgeInsets.all(16),
        child: Column(
          crossAxisAlignment: CrossAxisAlignment.start,
          children: [
            Text(
              '一覧を取得できませんでした',
              style: Theme.of(context).textTheme.titleMedium,
            ),
            const SizedBox(height: 8),
            Text(message),
            const SizedBox(height: 12),
            OutlinedButton.icon(
              onPressed: onRetry,
              icon: const Icon(Icons.refresh),
              label: const Text('再読込する'),
            ),
          ],
        ),
      ),
    );
  }
}

class _EmptyPanel extends StatelessWidget {
  const _EmptyPanel();

  @override
  Widget build(BuildContext context) {
    return Card(
      child: Padding(
        padding: const EdgeInsets.all(16),
        child: Column(
          children: const [
            Icon(Icons.inbox_outlined, size: 36),
            SizedBox(height: 8),
            Text('データが 0 件です。POST で 1 件追加してみてください。'),
          ],
        ),
      ),
    );
  }
}
コードのポイント
① ShipmentApiClient が GET と POST の責務を引き受けている
class ShipmentApiClient {
  ShipmentApiClient({http.Client? client}) : _client = client ?? http.Client();

  final http.Client _client;

  String get baseUrl {
    if (kIsWeb) {
      return 'http://localhost:3000';
    }

    if (defaultTargetPlatform == TargetPlatform.android) {
      return 'http://10.0.2.2:3000';
    }

    return 'http://localhost:3000';
  }

  Future<List<Shipment>> fetchShipments() async {
    try {
      final response = await _client
          .get(Uri.parse('$baseUrl/shipments'))
          .timeout(const Duration(seconds: 5));

      if (response.statusCode != 200) {
        throw ApiException(
          '一覧取得に失敗しました。statusCode: ${response.statusCode}',
        );
      }
    } catch (error) {
      throw _normalizeError(error);
    }
  }

  Future<Shipment> createShipment({
一覧取得と登録の HTTP 通信を ShipmentApiClient に集めることで、Widget 側は「いつ呼ぶか」と「結果をどう見せるか」に集中できます。さらに _normalizeError() で失敗理由を 1 か所へ集約しているため、UI には次の確認ポイントが分かる文言だけを返せます。
② 画面側は状態ごとに表示を切り替える
  Future<void> _loadShipments() async {
    setState(() {
      _isLoading = true;
      _loadError = null;
    });

    try {
      final shipments = await _apiClient.fetchShipments();

      if (!mounted) {
        return;
      }

      setState(() {
        _shipments = shipments;
      });
    } catch (error) {
      if (!mounted) {
        return;
      }

      setState(() {
        _loadError = error.toString();
      });
    } finally {
      if (!mounted) {
        return;
      }

      setState(() {
        _isLoading = false;
      });
    }
}_isLoading、_loadError、_shipments を分けることで、読込中、失敗、空、一覧ありの各状態を 1 画面で切り替えられます。FutureBuilder を使わずこの形にしているのは、再読込と登録処理を同じ画面で追いやすくするためです。
コードを貼り付けたら json-server を起動したままエミュレーターが立ち上がっている状態で、次のコマンドを実行します。
flutter run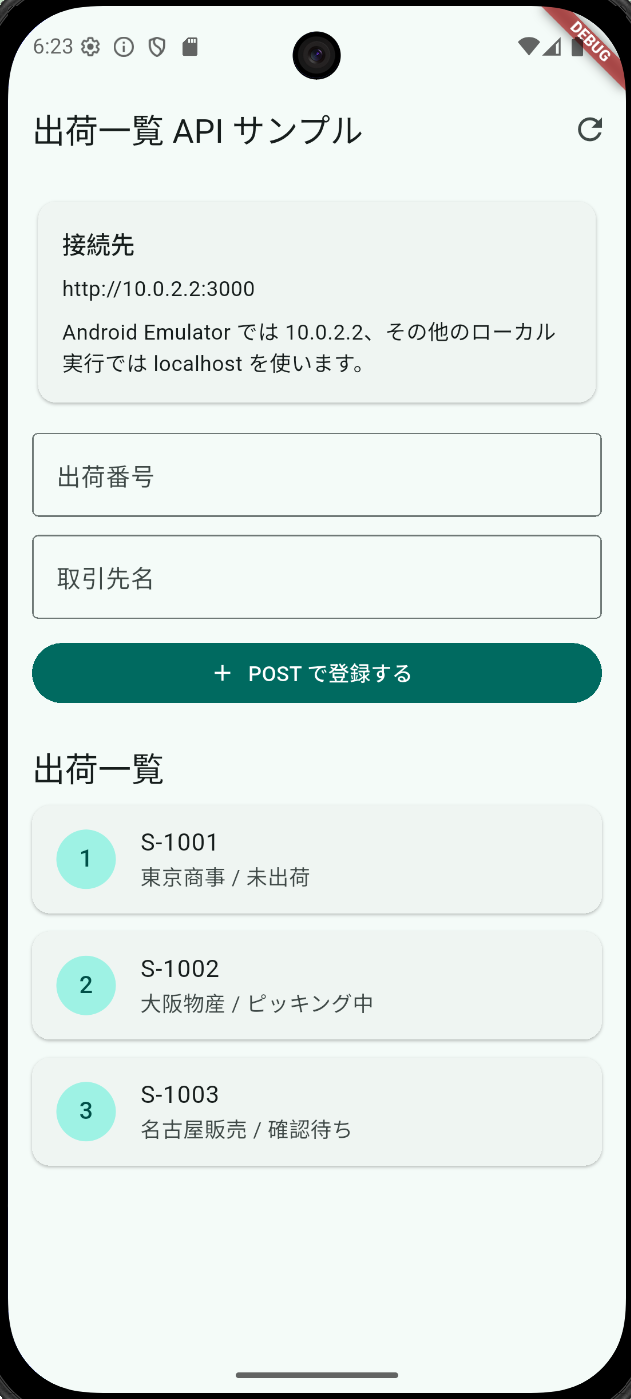
5. どこでエラーを拾うかを 4 パターンに分ける
今回のサンプルでは、失敗を次の 4 パターンに分けています。
| パターン | どこで拾うか | まず確認すること |
|---|---|---|
404 や 500 | response.statusCode | URL、エンドポイント、json-server の起動内容 |
| タイムアウト | .timeout(...) | サーバーが起動しているか、通信が止まっていないか |
| 接続失敗 | http.ClientException | Android Emulator なら 10.0.2.2 を使っているか |
| JSON 形式不正 | FormatException | db.json のキー名、配列 / オブジェクトの形 |
この 4 つを分ける理由は、読者が次の確認場所を迷わないようにするためです。全部を catch (e) でまとめて「通信に失敗しました」にしてしまうと、サーバー未起動なのか、URL 間違いなのか、JSON 構造違いなのかが見えません。
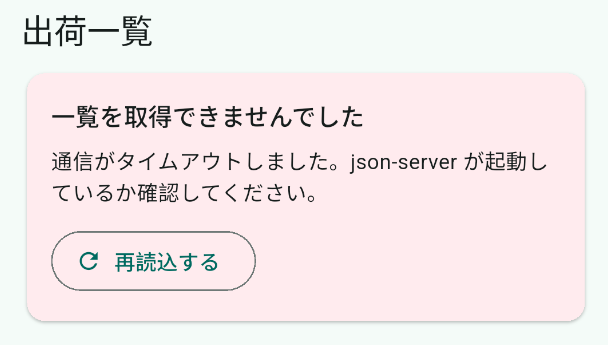
試しに json-server を止めて再読込すると、一覧部分は _ErrorPanel に切り替わります。逆に db.json の shipments をオブジェクトへ変えてしまうと、今度は JSON 形式不正として落ちます。どの分岐が動くかは、失敗を 1 回ずつ試すのが最も早い確認方法。
6. まとめ
Flutter から REST API を呼ぶ最初の構成として、json-server で GET /shipments と POST /shipments を用意し、Flutter 側では http パッケージ、Model 変換、一覧表示、エラー処理までを 1 ファイルで確認しました。
この入口が固まったら、次は手書き fromJson をどう減らすかを見るとつながりやすくなります。Flutterでjson_serializable + build_runnerを使ってJSONモデルを型安全に扱う では、今回のようなレスポンスを生成コードへ置き換える流れを扱います。まずは今回のサンプルを手元で動かし、json-server を止めたときと db.json を崩したときの違いまで確認しておくこと。その差が分かると、モデル生成へ進んだあとも迷いにくくなります。