FlutterからREST APIを呼ぶ最小構成(JSON通信 + エラー処理) で通信の入口を作り、Flutterの状態管理入門(Riverpod最小構成) で状態の置き場を分けたら、次に揃えたいのが非同期画面の見せ方です。止まりやすいのは API を呼ぶ処理そのものではありません。読み込み中、0 件、失敗をどう区別して見せるかが曖昧なまま画面を増やし始めるところです。この記事では flutter_riverpod の FutureProvider と AsyncValue を使い、ローディング表示、空状態、エラー表示、再試行、共通 UI 化の入口までを 1 画面で確認します。
1. ゴールと非対象
対象読者
- Flutter の REST API 通信と Riverpod の最小導入までは終わっている人
- 一覧画面を作り始めたが、0 件と失敗が同じ見え方になりやすい人
- 今後のフォーム、一覧検索、CRUD、認証記事へ進む前に、非同期画面の基本形を揃えたい人
この記事で到達する状態
FutureProviderで非同期の一覧取得を表現できるAsyncValueのloading/error/dataを UI へ分けて表示できるdata.isEmptyを別分岐として扱い、空状態をエラーと混同しないref.invalidate(shipmentsProvider)で再試行できる- ローディング・空状態・エラー表示を
AsyncValuePane<T>へ寄せる入口を作れる
非対象
- 実際の HTTP 通信や
dioへの移行 - 認証ガードやトークン失効時の分岐
sealed classとパターンマッチング- ページング、無限スクロール、検索条件保持
- Riverpod Generator や
freezed
今回は UI 状態の整理に絞ります。通信の作り方は REST API 記事で扱っているため、ここでは成功 / 0 件 / 失敗を切り替えられる擬似 Repository を使い、画面の受け止め方だけを見ます。
2. なぜ 0 件と失敗を分けるのか
AsyncValue を使うと、Riverpod 側では次の 3 状態を 1 つの型で扱えます。
flowchart LR
  A[状態切替 UI] --> B[selectedScenarioProvider]
  B --> C[shipmentsProvider]
  C -->|取得中| D[loading]
  C -->|例外発生| E[error]
  C -->|取得成功| F[data]
  F -->|0件| G[empty state]
  F -->|1件以上| H[list UI]
  E --> I[再試行ボタン]
  I --> C
ここで分けたいのは 2 つです。
- 取得に失敗したのか
- 取得には成功したが結果が 0 件なのか
この 2 つは、読者にも利用者にも意味が違います。失敗なら再試行や接続確認を促す必要があります。0 件なら検索条件を見直す、まだ登録されていない、といった案内のほうが伝わりやすくなります。AsyncValue の data に空リストが入るケースは error ではないため、UI 側で isEmpty を別に見る必要があります。
3. プロジェクトを作成し、Riverpod を追加する
3-1. 環境構築がまだなら先に済ませる
環境構築がまだの場合は Windows 11で始めるFlutter開発環境 を先に参照してください。
3-2. Flutter プロジェクトを作成する
次のコマンドでプロジェクトを作成します。
flutter create my_async_state_app
cd my_async_state_app
3-3. エミュレーターを起動する
利用可能なエミュレーター一覧を確認します。
flutter emulators表示された ID を指定して起動します。
flutter emulators --launch <emulator_id>3-4. flutter_riverpod を追加する
プロジェクト直下で次のコマンドを実行します。
flutter pub add flutter_riverpodこの記事のサンプルコードは Riverpod 3.x 以上を前提にしています。以降は flutter run で確認できます。
4. lib/main.dart を作成して 3 状態を表示する
この lib/main.dart は、loading、empty、error を AsyncValue で切り替えつつ、表示ルールを共通部品へ寄せるサンプルです。どこが状態の入口で、どこが見た目の共通化ポイントかに注目してください。
lib/main.dart は次の内容に書き換えます。
import 'dart:async';

import 'package:flutter/material.dart';
import 'package:flutter_riverpod/flutter_riverpod.dart';

void main() {
  runApp(const ProviderScope(child: AsyncStateApp()));
}

enum LoadScenario {
  success('正常データ'),
  empty('0件'),
  error('失敗');

  const LoadScenario(this.label);

  final String label;
}

class Shipment {
  const Shipment({
    required this.id,
    required this.code,
    required this.customer,
    required this.status,
  });

  final int id;
  final String code;
  final String customer;
  final String status;
}

class ShipmentRepository {
  static const List<Shipment> _mockShipments = <Shipment>[
    Shipment(
      id: 1,
      code: 'S-1001',
      customer: '東京商事',
      status: '未出荷',
    ),
    Shipment(
      id: 2,
      code: 'S-1002',
      customer: '大阪物産',
      status: 'ピッキング中',
    ),
    Shipment(
      id: 3,
      code: 'S-1003',
      customer: '名古屋販売',
      status: '確認待ち',
    ),
  ];

  Future<List<Shipment>> fetchShipments(LoadScenario scenario) async {
    await Future<void>.delayed(const Duration(seconds: 2));

    switch (scenario) {
      case LoadScenario.success:
        return _mockShipments;
      case LoadScenario.empty:
        return const <Shipment>[];
      case LoadScenario.error:
        throw Exception(
          '出荷一覧を取得できませんでした。ネットワーク接続かサーバー状態を確認してください。',
        );
    }
  }
}

final Provider<ShipmentRepository> shipmentRepositoryProvider =
    Provider<ShipmentRepository>((Ref ref) {
      return ShipmentRepository();
    });

class SelectedScenarioNotifier extends Notifier<LoadScenario> {
  @override
  LoadScenario build() => LoadScenario.success;
}

final NotifierProvider<SelectedScenarioNotifier, LoadScenario>
    selectedScenarioProvider =
    NotifierProvider<SelectedScenarioNotifier, LoadScenario>(
      SelectedScenarioNotifier.new,
    );

final FutureProvider<List<Shipment>> shipmentsProvider =
    FutureProvider<List<Shipment>>((Ref ref) async {
      final LoadScenario scenario = ref.watch(selectedScenarioProvider);
      final ShipmentRepository repository = ref.watch(
        shipmentRepositoryProvider,
      );

      return repository.fetchShipments(scenario);
    });

class AsyncStateApp extends StatelessWidget {
  const AsyncStateApp({super.key});

  @override
  Widget build(BuildContext context) {
    return MaterialApp(
      title: 'AsyncValue States Sample',
      theme: ThemeData(
        useMaterial3: true,
        colorScheme: ColorScheme.fromSeed(seedColor: Colors.teal),
      ),
      home: const ShipmentStatusPage(),
    );
  }
}

class ShipmentStatusPage extends ConsumerWidget {
  const ShipmentStatusPage({super.key});

  @override
  Widget build(BuildContext context, WidgetRef ref) {
    final LoadScenario selectedScenario = ref.watch(selectedScenarioProvider);
    final AsyncValue<List<Shipment>> shipmentsAsync = ref.watch(
      shipmentsProvider,
    );

    return Scaffold(
      appBar: AppBar(
        title: const Text('出荷一覧の3状態サンプル'),
        actions: <Widget>[
          IconButton(
            onPressed: () => ref.invalidate(shipmentsProvider),
            icon: const Icon(Icons.refresh),
            tooltip: '再読み込み',
          ),
        ],
      ),
      body: ListView(
        padding: const EdgeInsets.all(16),
        children: <Widget>[
          Text(
            '状態を切り替えると、loading -> data / empty / error の見え方を確認できます。',
            style: Theme.of(context).textTheme.bodyLarge,
          ),
          const SizedBox(height: 16),
          ScenarioSelector(
            selectedScenario: selectedScenario,
            onSelected: (LoadScenario scenario) {
              ref.read(selectedScenarioProvider.notifier).state = scenario;
            },
          ),
          const SizedBox(height: 24),
          AsyncValuePane<List<Shipment>>(
            value: shipmentsAsync,
            isEmpty: (List<Shipment> items) => items.isEmpty,
            loadingLabel: '出荷一覧を読み込んでいます...',
            emptyTitle: '出荷データがありません',
            emptyMessage: '0 件のときは失敗ではなく、条件に一致するデータがない状態として扱います。',
            onRetry: () => ref.invalidate(shipmentsProvider),
            dataBuilder: (BuildContext context, List<Shipment> items) {
              return Column(
                crossAxisAlignment: CrossAxisAlignment.start,
                children: <Widget>[
                  Text(
                    '取得件数: ${items.length}件',
                    style: Theme.of(context).textTheme.titleMedium,
                  ),
                  const SizedBox(height: 12),
                  for (final Shipment shipment in items)
                    ShipmentCard(shipment: shipment),
                ],
              );
            },
          ),
        ],
      ),
    );
  }
}

class ScenarioSelector extends StatelessWidget {
  const ScenarioSelector({
    super.key,
    required this.selectedScenario,
    required this.onSelected,
  });

  final LoadScenario selectedScenario;
  final ValueChanged<LoadScenario> onSelected;

  @override
  Widget build(BuildContext context) {
    return Column(
      crossAxisAlignment: CrossAxisAlignment.start,
      children: <Widget>[
        Text(
          '取得結果を切り替える',
          style: Theme.of(context).textTheme.titleMedium,
        ),
        const SizedBox(height: 12),
        SegmentedButton<LoadScenario>(
          segments: LoadScenario.values
              .map(
                (LoadScenario scenario) => ButtonSegment<LoadScenario>(
                  value: scenario,
                  label: Text(scenario.label),
                ),
              )
              .toList(growable: false),
          selected: <LoadScenario>{selectedScenario},
          onSelectionChanged: (Set<LoadScenario> values) {
            onSelected(values.first);
          },
        ),
      ],
    );
  }
}

class AsyncValuePane<T> extends StatelessWidget {
  const AsyncValuePane({
    super.key,
    required this.value,
    required this.isEmpty,
    required this.loadingLabel,
    required this.emptyTitle,
    required this.emptyMessage,
    required this.onRetry,
    required this.dataBuilder,
  });

  final AsyncValue<T> value;
  final bool Function(T data) isEmpty;
  final String loadingLabel;
  final String emptyTitle;
  final String emptyMessage;
  final VoidCallback onRetry;
  final Widget Function(BuildContext context, T data) dataBuilder;

  @override
  Widget build(BuildContext context) {
    return value.when(
      loading: () {
        return StateCard(
          icon: Icons.hourglass_bottom,
          title: '読み込み中',
          message: loadingLabel,
          showProgress: true,
        );
      },
      error: (Object error, StackTrace stackTrace) {
        return StateCard(
          icon: Icons.cloud_off,
          title: '取得に失敗しました',
          message: error.toString(),
          actionLabel: '再試行する',
          onAction: onRetry,
        );
      },
      data: (T data) {
        if (isEmpty(data)) {
          return StateCard(
            icon: Icons.inbox_outlined,
            title: emptyTitle,
            message: emptyMessage,
            actionLabel: 'もう一度読み込む',
            onAction: onRetry,
          );
        }

        return dataBuilder(context, data);
      },
    );
  }
}

class StateCard extends StatelessWidget {
  const StateCard({
    super.key,
    required this.icon,
    required this.title,
    required this.message,
    this.actionLabel,
    this.onAction,
    this.showProgress = false,
  });

  final IconData icon;
  final String title;
  final String message;
  final String? actionLabel;
  final VoidCallback? onAction;
  final bool showProgress;

  @override
  Widget build(BuildContext context) {
    return Card(
      child: Padding(
        padding: const EdgeInsets.all(24),
        child: Column(
          children: <Widget>[
            Icon(icon, size: 40),
            const SizedBox(height: 12),
            Text(
              title,
              style: Theme.of(context).textTheme.titleMedium,
              textAlign: TextAlign.center,
            ),
            const SizedBox(height: 8),
            Text(
              message,
              style: Theme.of(context).textTheme.bodyMedium,
              textAlign: TextAlign.center,
            ),
            if (showProgress) ...<Widget>[
              const SizedBox(height: 16),
              const CircularProgressIndicator(),
            ],
            if (actionLabel != null && onAction != null) ...<Widget>[
              const SizedBox(height: 16),
              FilledButton(
                onPressed: onAction,
                child: Text(actionLabel!),
              ),
            ],
          ],
        ),
      ),
    );
  }
}

class ShipmentCard extends StatelessWidget {
  const ShipmentCard({
    super.key,
    required this.shipment,
  });

  final Shipment shipment;

  @override
  Widget build(BuildContext context) {
    return Card(
      margin: const EdgeInsets.only(bottom: 12),
      child: ListTile(
        leading: CircleAvatar(child: Text('${shipment.id}')),
        title: Text(shipment.code),
        subtitle: Text('${shipment.customer} / ${shipment.status}'),
      ),
    );
  }
}
コードのポイント
① 表示する状態の切り替えは selectedScenarioProvider が持つ
final NotifierProvider<SelectedScenarioNotifier, LoadScenario>
    selectedScenarioProvider =
    NotifierProvider<SelectedScenarioNotifier, LoadScenario>(
      SelectedScenarioNotifier.new,
    );
画面上で success、empty、error を切り替える state を 1 か所へ寄せています。UI 側はこの provider を読むだけで、今どの条件で取得するかを判断できます。
② 非同期取得は FutureProvider で表現する
final FutureProvider<List<Shipment>> shipmentsProvider =
    FutureProvider<List<Shipment>>((Ref ref) async {
      final LoadScenario scenario = ref.watch(selectedScenarioProvider);
      final ShipmentRepository repository = ref.watch(
        shipmentRepositoryProvider,
      );
取得条件を watch しているので、シナリオが変わるたびに shipmentsProvider の結果も更新されます。どの状態で何を返すかは ShipmentRepository 側に残し、画面は取得結果だけを見る構成です。
③ 3 状態の見せ方は AsyncValuePane<T> にまとめる
AsyncValuePane<List<Shipment>>(
  value: shipmentsAsync,
  isEmpty: (List<Shipment> items) => items.isEmpty,
  loadingLabel: '出荷一覧を読み込んでいます...',
  emptyTitle: '出荷データがありません',
  onRetry: () => ref.invalidate(shipmentsProvider),
  dataBuilder: (BuildContext context, List<Shipment> items) {
画面ごとに when を書き散らす代わりに、共通 UI を AsyncValuePane<T> に閉じ込めています。差し替えるのは dataBuilder と文言だけなので、loading、empty、error の見た目をそろえやすくなります。
AsyncValue.when を画面ごとに直接書き始めると、空状態のメッセージや再試行ボタンの位置がすぐばらつきます。今回の AsyncValuePane<T> は、一覧ごとに違うのは dataBuilder だけにし、それ以外の見せ方をそろえる入口です。
5. flutter run で各状態を確認する
lib/main.dart を保存したら、次のコマンドで起動します。
flutter run起動後は上部のセグメントを順に切り替えます。
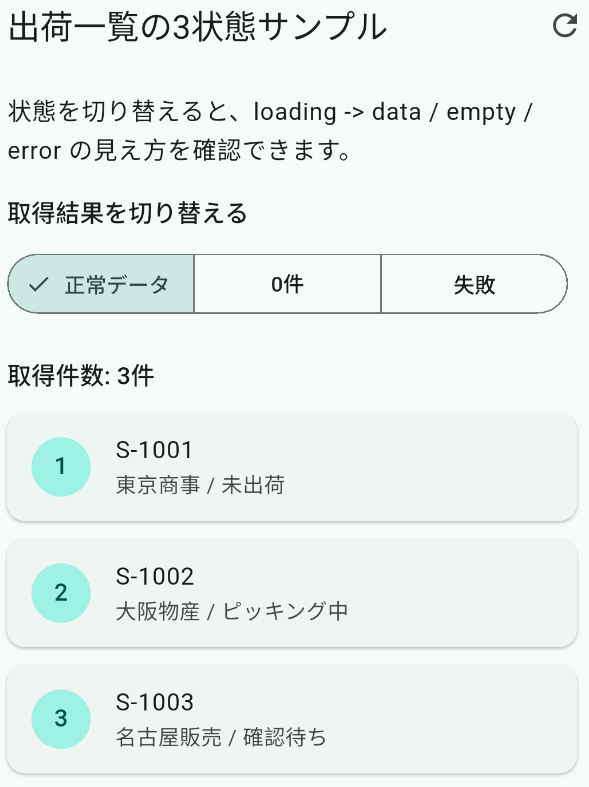
5-1. ローディング表示を確認する
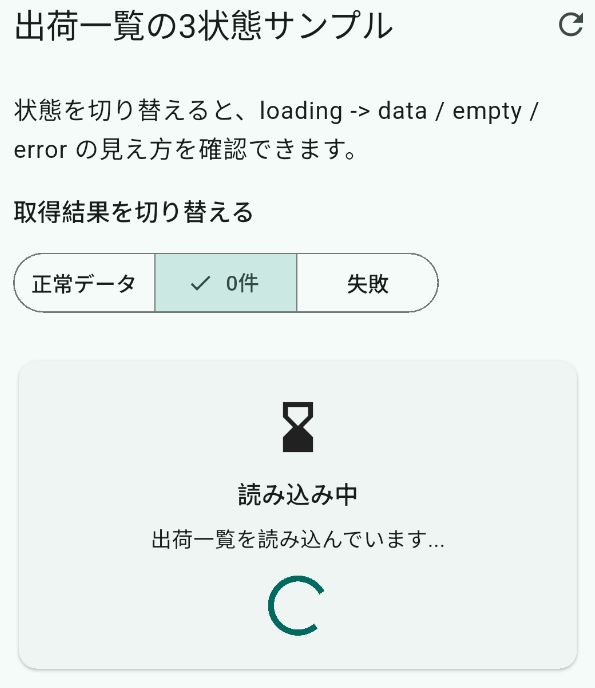
どの状態へ切り替えても、最初に 2 秒間のローディング表示が出ます。ここで読み込み中の文言とスピナーがまとまっているかを確認します。
5-2. 空状態を確認する
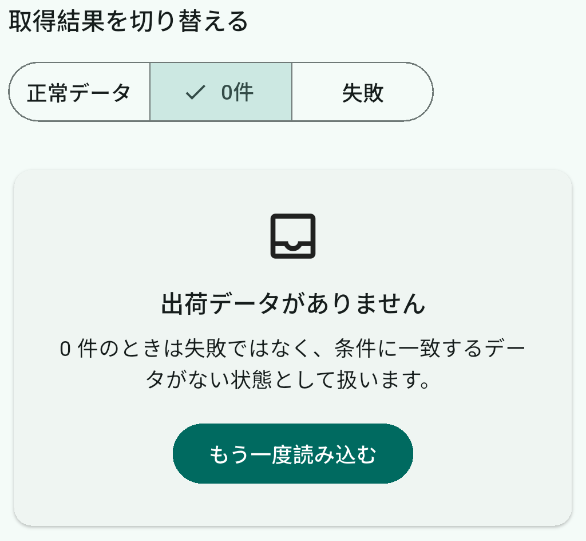
0件 を選ぶと、取得失敗ではなく「条件に一致するデータがない」画面になります。検索画面やフィルター付き一覧では、この見せ方のほうが次の行動を案内しやすくなります。
5-3. エラー表示と再試行を確認する
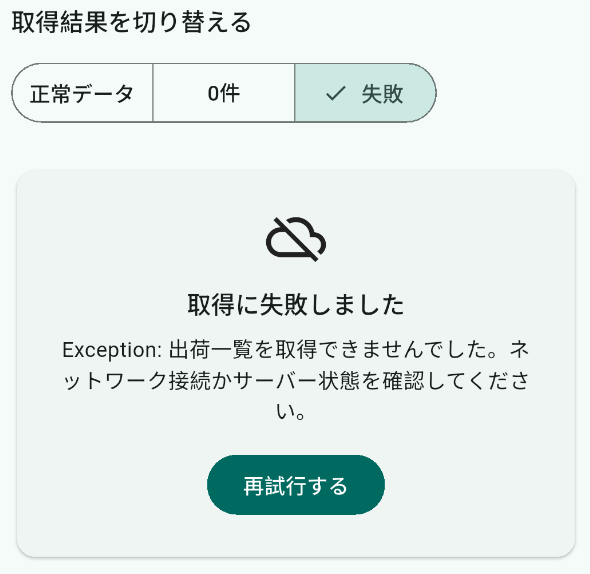
失敗 を選ぶと、例外メッセージと再試行ボタンが出ます。再試行しても selectedScenarioProvider が 失敗 のままなら同じエラーになります。正常データ へ戻してから再試行すると、一覧表示へ復帰します。
6. 共通 UI と後続記事へのつなぎ方
今回のサンプルで持ち帰りたいのは、AsyncValue 自体よりも分岐の置き場です。
- ローディング表示は「待っている最中」だと伝える
- 空状態は「取得成功だが 0 件」であることを示す
- エラー表示は「失敗したので再試行できる」と案内する
これを ConsumerWidget ごとに毎回書くより、AsyncValuePane<T> のような共通 Widget へ寄せたほうが、一覧画面、詳細画面、検索結果画面で文言やボタン位置をそろえやすくなります。
役割分担は次のように考えると整理しやすくなります。
- REST API 記事: どこへ通信し、どこで失敗を拾うか
- Riverpod 記事: 状態をどこへ置き、どこで更新するか
- 今回の記事: 取得結果を UI でどう受け止めるか
実 API へつなぐときは、今回の ShipmentRepository を http や dio を使う実装へ差し替えるだけで、FutureProvider と AsyncValuePane<T> の骨格はそのまま維持できます。
7. まとめ
非同期画面で揃えたいのは、スピナーを出すことではありません。ローディング、0 件、失敗を別の意味として扱い、利用者が次に何をすればよいか分かる見せ方にすることです。Riverpod を入れたあとにこの 3 状態を固めておくと、次に一覧検索や CRUD を足すときも画面ごとの差が増えにくくなります。