Flutterでjson_serializable + build_runnerを使ってJSONモデルを型安全に扱う で API レスポンスを Dart の型へ寄せ、Flutterの状態管理入門(Riverpod最小構成) と Flutterでローディング・空状態・エラー表示を整える で画面の受け止め方を揃えたら、次に整理したいのが分岐の持ち方です。成功、0件、未認証、通信失敗を enum と String? errorMessage のように並べていくと、状態が増えるほど「どの値がどの状態で有効なのか」が読み取りにくくなります。この記事では Dart 3 の sealed class と switch 式のパターンマッチングを使い、API 結果の分岐を型で表しながら安全に書く最小構成を確認します。
1. ゴールと非対象
対象読者
- Flutter の REST API 通信、JSON モデル生成、Riverpod、ローディング / 空状態 / エラー表示の入口までは終わっている人
- 状態が増えるにつれて
enumと補助変数の組み合わせが重くなってきた人 - Dart 3 の
sealed classを見かけるが、実際にどこへ使うかまだ固まっていない人
この記事で到達する状態
sealed classと派生型で API 結果を表現できるswitch式でLoading/Success/Empty/Unauthorized/NetworkErrorを網羅的に分岐できる- パターンマッチングで
Success(:final data)のように値を取り出せる when相当のヘルパーとswitch式の使い分けを説明できる- 既存の REST API / Riverpod / ローディング記事へ、どこから組み込むか判断できる
非対象
freezedの導入とコード生成- 実 API 通信や
dioの説明 - Riverpod Generator や
AsyncNotifier - 認証ガードやフォームバリデーションの実装
- 複数ファイル分割やレイヤー設計の深掘り
今回は Dart 3 の分岐表現に絞ります。状態管理ライブラリの詳説へ広げず、まずは「状態ごとに必要な値が違うなら、型ごとに分けて受ける」という土台づくりに集中します。
2. enum と null だけでは意味が崩れやすい理由
たとえば API 呼び出し結果を次のように持ち始めることがあります。
status = successitems = [...]errorMessage = null
この形は最初の 2 状態くらいなら読めます。問題は、状態が増えるにつれて「どの値がその状態で意味を持つのか」が崩れやすいところです。
- 成功時だけ
itemsが必要 - 通信失敗時だけ
errorMessageが必要 - 未認証時は再ログイン導線が必要
- 0件は失敗ではないため、エラーメッセージとは別扱いにしたい
状態ごとに必要な情報が違うなら、1つの型へ押し込むより分けたほうが読みやすくなります。Dart 3 の sealed class は、この「分けた型を switch で漏れなく受ける」ための土台です。
3. 先に分岐の流れを掴む
今回のサンプルでは、擬似 Repository が ApiResult<List<Shipment>> を返し、UI は switch 式で受け取ります。
flowchart LR
  A[画面で状態を選ぶ] --> B[ShipmentRepository.fetchShipments]
  B --> C{ApiResult<List<Shipment>>}
  C -->|Loading| D[switch式でローディングUI]
  C -->|Success| E[switch式で一覧UI]
  C -->|Empty| F[switch式で0件UI]
  C -->|Unauthorized| G[switch式で再ログイン導線]
  C -->|NetworkError| H[switch式でエラーUI]
  C --> I[when相当ヘルパーで要約文を生成]
見るべき点は 2 つです。
- 結果を
sealed classのどれか 1 つとして返す - 画面側では
switchの各アームを埋め切り、分岐漏れを防ぐ
success かどうかだけを見る形より、状態名と必要データが 1 対 1 で結びつくため、後から状態が増えても読みやすさを保ちやすい構造です。
4. lib/main.dart を作って ApiResult<T> を表現する
このサンプルは flutter run で確認できます。外部パッケージ不要なので、DartPad でも確認できます。
lib/main.dart は次の内容で作成します。ApiResult<T> の型定義、when 相当 extension、UI の switch 分岐までを 1 ファイルにまとめました。先に ApiResult<T> を定義しておくと、その後の分岐を追いやすくなります。
import 'dart:async';

import 'package:flutter/material.dart';

void main() {
  runApp(const SealedClassDemoApp());
}

enum DemoScenario {
  success('成功'),
  empty('0件'),
  unauthorized('認証切れ'),
  networkError('通信失敗');

  const DemoScenario(this.label);

  final String label;
}

class Shipment {
  const Shipment({
    required this.code,
    required this.customerName,
    required this.status,
  });

  final String code;
  final String customerName;
  final String status;
}

sealed class ApiResult<T> {
  const ApiResult();
}

final class Loading<T> extends ApiResult<T> {
  const Loading();
}

final class Success<T> extends ApiResult<T> {
  const Success(this.data);

  final T data;
}

final class Empty<T> extends ApiResult<T> {
  const Empty();
}

final class Unauthorized<T> extends ApiResult<T> {
  const Unauthorized();
}

final class NetworkError<T> extends ApiResult<T> {
  const NetworkError(this.message);

  final String message;
}

extension ApiResultWhen<T> on ApiResult<T> {
  R when<R>({
    required R Function() loading,
    required R Function(T data) success,
    required R Function() empty,
    required R Function() unauthorized,
    required R Function(String message) networkError,
  }) {
    return switch (this) {
      Loading<T>() => loading(),
      Success<T>(:final data) => success(data),
      Empty<T>() => empty(),
      Unauthorized<T>() => unauthorized(),
      NetworkError<T>(:final message) => networkError(message),
    };
  }
}

class ShipmentRepository {
  static const List<Shipment> _sampleShipments = <Shipment>[
    Shipment(
      code: 'S-1001',
      customerName: '東京商事',
      status: '未出荷',
    ),
    Shipment(
      code: 'S-1002',
      customerName: '大阪物産',
      status: 'ピッキング中',
    ),
    Shipment(
      code: 'S-1003',
      customerName: '名古屋販売',
      status: '確認待ち',
    ),
  ];

  Future<ApiResult<List<Shipment>>> fetchShipments(DemoScenario scenario) async {
    await Future<void>.delayed(const Duration(milliseconds: 800));

    return switch (scenario) {
      DemoScenario.success =>
        const Success<List<Shipment>>(_sampleShipments),
      DemoScenario.empty => const Empty<List<Shipment>>(),
      DemoScenario.unauthorized => const Unauthorized<List<Shipment>>(),
      DemoScenario.networkError => const NetworkError<List<Shipment>>(
        '倉庫サーバーへ接続できませんでした。Wi-Fi と API サーバー状態を確認してください。',
      ),
    };
  }
}

class SealedClassDemoApp extends StatelessWidget {
  const SealedClassDemoApp({super.key});

  @override
  Widget build(BuildContext context) {
    return MaterialApp(
      title: 'Sealed Class Demo',
      theme: ThemeData(
        useMaterial3: true,
        colorScheme: ColorScheme.fromSeed(seedColor: Colors.teal),
      ),
      home: const SealedClassDemoPage(),
    );
  }
}

class SealedClassDemoPage extends StatefulWidget {
  const SealedClassDemoPage({super.key});

  @override
  State<SealedClassDemoPage> createState() => _SealedClassDemoPageState();
}

class _SealedClassDemoPageState extends State<SealedClassDemoPage> {
  final ShipmentRepository _repository = ShipmentRepository();

  DemoScenario _selectedScenario = DemoScenario.success;
  ApiResult<List<Shipment>> _result = const Loading<List<Shipment>>();

  @override
  void initState() {
    super.initState();
    unawaited(_reload());
  }

  Future<void> _reload() async {
    setState(() {
      _result = const Loading<List<Shipment>>();
    });

    final ApiResult<List<Shipment>> next = await _repository.fetchShipments(
      _selectedScenario,
    );

    if (!mounted) {
      return;
    }

    setState(() {
      _result = next;
    });
  }

  @override
  Widget build(BuildContext context) {
    final ThemeData theme = Theme.of(context);

    final String switchSummary = switch (_result) {
      Loading<List<Shipment>>() => 'switch: 読み込み中を表示します。',
      Success<List<Shipment>>(:final data) when data.length == 1 =>
        'switch: 1件の出荷データを表示します。',
      Success<List<Shipment>>(:final data) =>
        'switch: ${data.length}件の出荷データを表示します。',
      Empty<List<Shipment>>() => 'switch: 取得成功だが 0 件です。',
      Unauthorized<List<Shipment>>() =>
        'switch: ログイン画面へ戻す分岐を選べます。',
      NetworkError<List<Shipment>>(:final message) =>
        'switch: 通信失敗です。$message',
    };

    final String whenSummary = _result.when(
      loading: () => 'when相当: ローディング文言を返します。',
      success: (List<Shipment> data) =>
        'when相当: 成功時だけ data を受け取り、${data.length}件として扱えます。',
      empty: () => 'when相当: 0件専用の文言を返します。',
      unauthorized: () => 'when相当: 未認証専用の導線へつなげられます。',
      networkError: (String message) =>
        'when相当: エラー内容を受け取り、短い要約へ流せます。$message',
    );

    final String firstShipmentLabel = switch (_result) {
      Success<List<Shipment>>(
        data: [Shipment(:final code, :final customerName, :final status), ...],
      ) => '先頭データ: $code / $customerName / $status',
      Success<List<Shipment>>() => '先頭データ: 成功だが一覧は空です。',
      Loading<List<Shipment>>() => '先頭データ: 読み込み後に表示します。',
      Empty<List<Shipment>>() => '先頭データ: 0件です。',
      Unauthorized<List<Shipment>>() => '先頭データ: 未認証のためありません。',
      NetworkError<List<Shipment>>() => '先頭データ: 通信失敗のためありません。',
    };

    return Scaffold(
      appBar: AppBar(
        title: const Text('sealed class で API 結果を分ける'),
        actions: <Widget>[
          IconButton(
            onPressed: _reload,
            icon: const Icon(Icons.refresh),
            tooltip: '再読み込み',
          ),
        ],
      ),
      body: ListView(
        padding: const EdgeInsets.all(16),
        children: <Widget>[
          Text(
            '状態を切り替えると、同じ ApiResult<List<Shipment>> を switch と when相当でどう扱うか確認できます。',
            style: theme.textTheme.bodyLarge,
          ),
          const SizedBox(height: 16),
          ScenarioSelector(
            selectedScenario: _selectedScenario,
            onSelected: (DemoScenario scenario) {
              setState(() {
                _selectedScenario = scenario;
              });
              unawaited(_reload());
            },
          ),
          const SizedBox(height: 16),
          InfoCard(
            title: 'switch式の要約',
            message: switchSummary,
          ),
          const SizedBox(height: 12),
          InfoCard(
            title: 'when相当の要約',
            message: whenSummary,
          ),
          const SizedBox(height: 12),
          InfoCard(
            title: 'リストパターンの例',
            message: firstShipmentLabel,
          ),
          const SizedBox(height: 24),
          _buildResultPane(theme),
        ],
      ),
    );
  }

  Widget _buildResultPane(ThemeData theme) {
    return switch (_result) {
      Loading<List<Shipment>>() => const StateCard(
        icon: Icons.hourglass_bottom,
        title: '読み込み中',
        message: 'API 応答待ちの間は Loading をそのまま UI へ渡します。',
        showProgress: true,
      ),
      Success<List<Shipment>>(:final data) => Card(
        child: Padding(
          padding: const EdgeInsets.all(16),
          child: Column(
            crossAxisAlignment: CrossAxisAlignment.start,
            children: <Widget>[
              Text(
                '出荷一覧',
                style: theme.textTheme.titleMedium,
              ),
              const SizedBox(height: 8),
              Text('取得件数: ${data.length}件'),
              const SizedBox(height: 12),
              for (final Shipment shipment in data)
                Padding(
                  padding: const EdgeInsets.only(bottom: 12),
                  child: ShipmentCard(shipment: shipment),
                ),
            ],
          ),
        ),
      ),
      Empty<List<Shipment>>() => const StateCard(
        icon: Icons.inbox_outlined,
        title: '出荷データがありません',
        message: '0件は失敗ではないため、空状態専用の UI を出します。',
      ),
      Unauthorized<List<Shipment>>() => StateCard(
        icon: Icons.lock_outline,
        title: 'ログインし直してください',
        message: '401 を例外文字列へ押し込めず、未認証専用の分岐として扱えます。',
        actionLabel: 'ログイン画面へ戻る',
        onAction: () {
          ScaffoldMessenger.of(context).showSnackBar(
            const SnackBar(content: Text('ここでログイン画面へ遷移します。')),
          );
        },
      ),
      NetworkError<List<Shipment>>(:final message) => StateCard(
        icon: Icons.cloud_off,
        title: '通信に失敗しました',
        message: message,
        actionLabel: '再試行する',
        onAction: _reload,
      ),
    };
  }
}

class ScenarioSelector extends StatelessWidget {
  const ScenarioSelector({
    super.key,
    required this.selectedScenario,
    required this.onSelected,
  });

  final DemoScenario selectedScenario;
  final ValueChanged<DemoScenario> onSelected;

  @override
  Widget build(BuildContext context) {
    return Column(
      crossAxisAlignment: CrossAxisAlignment.start,
      children: <Widget>[
        Text(
          '擬似 API の結果を切り替える',
          style: Theme.of(context).textTheme.titleMedium,
        ),
        const SizedBox(height: 12),
        SingleChildScrollView(
          scrollDirection: Axis.horizontal,
          child: SegmentedButton<DemoScenario>(
            segments: DemoScenario.values
                .map(
                  (DemoScenario scenario) => ButtonSegment<DemoScenario>(
                    value: scenario,
                    label: Text(
                      scenario.label,
                      softWrap: false,
                    ),
                  ),
                )
                .toList(growable: false),
            selected: <DemoScenario>{selectedScenario},
            onSelectionChanged: (Set<DemoScenario> values) {
              onSelected(values.first);
            },
          ),
        ),
      ],
    );
  }
}

class InfoCard extends StatelessWidget {
  const InfoCard({
    super.key,
    required this.title,
    required this.message,
  });

  final String title;
  final String message;

  @override
  Widget build(BuildContext context) {
    return Card(
      child: Padding(
        padding: const EdgeInsets.all(16),
        child: Column(
          crossAxisAlignment: CrossAxisAlignment.start,
          children: <Widget>[
            Text(
              title,
              style: Theme.of(context).textTheme.titleSmall,
            ),
            const SizedBox(height: 8),
            Text(message),
          ],
        ),
      ),
    );
  }
}

class StateCard extends StatelessWidget {
  const StateCard({
    super.key,
    required this.icon,
    required this.title,
    required this.message,
    this.actionLabel,
    this.onAction,
    this.showProgress = false,
  });

  final IconData icon;
  final String title;
  final String message;
  final String? actionLabel;
  final VoidCallback? onAction;
  final bool showProgress;

  @override
  Widget build(BuildContext context) {
    return Card(
      child: Padding(
        padding: const EdgeInsets.all(24),
        child: Column(
          children: <Widget>[
            Icon(icon, size: 40),
            const SizedBox(height: 12),
            Text(
              title,
              style: Theme.of(context).textTheme.titleMedium,
              textAlign: TextAlign.center,
            ),
            const SizedBox(height: 8),
            Text(
              message,
              textAlign: TextAlign.center,
            ),
            if (showProgress) ...<Widget>[
              const SizedBox(height: 16),
              const CircularProgressIndicator(),
            ],
            if (actionLabel != null && onAction != null) ...<Widget>[
              const SizedBox(height: 16),
              FilledButton(
                onPressed: onAction,
                child: Text(actionLabel!),
              ),
            ],
          ],
        ),
      ),
    );
  }
}

class ShipmentCard extends StatelessWidget {
  const ShipmentCard({
    super.key,
    required this.shipment,
  });

  final Shipment shipment;

  @override
  Widget build(BuildContext context) {
    return DecoratedBox(
      decoration: BoxDecoration(
        borderRadius: BorderRadius.circular(12),
        color: Theme.of(context).colorScheme.surfaceContainerHighest,
      ),
      child: Padding(
        padding: const EdgeInsets.all(16),
        child: Column(
          crossAxisAlignment: CrossAxisAlignment.start,
          children: <Widget>[
            Text(
              shipment.code,
              style: Theme.of(context).textTheme.titleSmall,
            ),
            const SizedBox(height: 4),
            Text('取引先: ${shipment.customerName}'),
            Text('状態: ${shipment.status}'),
          ],
        ),
      ),
    );
  }
}
コードのポイント
① sealed class で継承を封じ、final class で状態を列挙する
sealed class ApiResult<T> {
  const ApiResult();
}

final class Success<T> extends ApiResult<T> {
  const Success(this.data);

  final T data;
}
sealed を付けると、同一ライブラリ外からの継承が禁止されます。派生型が Loading / Success / Empty / Unauthorized / NetworkError の 5 つだけと確定するため、switch の網羅チェックが機能します。final class にすることで、派生型をさらに継承する道も閉じています。
② 状態ごとに必要な値だけを持たせる
final class Success<T> extends ApiResult<T> {
  const Success(this.data);
  final T data;
}

final class NetworkError<T> extends ApiResult<T> {
  const NetworkError(this.message);
  final String message;
}
Success だけが data を持ち、NetworkError だけが message を持ちます。Loading や Empty は値を持ちません。1 つの型に全フィールドを押し込む構造と違い、「成功ではないのに items が残っている」といった状態の混線が構造上起きません。
③ when 相当 extension の中身も switch 式
return switch (this) {
  Loading<T>() => loading(),
  Success<T>(:final data) => success(data),
  Empty<T>() => empty(),
  Unauthorized<T>() => unauthorized(),
  NetworkError<T>(:final message) => networkError(message),
};
Success<T>(:final data) はオブジェクトパターンによる値の取り出しです。data フィールドを直接束縛し、アーム内でそのまま使えます。when 相当ヘルパーの実装も結局この switch 式なので、Dart 3 では専用構文がなくても同じ考え方で組み立てられます。
5. switch 式で網羅的に分岐する
上のコードで見るべき switch は 3 か所あります。
switchSummary: 文言を返すswitch式firstShipmentLabel: オブジェクトパターンとリストパターンを使うswitch式_buildResultPane(): Widget 自体を返すswitch式
たとえば次の形です。
Success<List<Shipment>>(:final data)Successのときだけdataを取り出す
when data.length == 1- ガードを付けて、同じ型でも追加条件で分岐する
data: [Shipment(:final code, :final customerName, :final status), ...]Successの中身が 1 件以上あるときだけ、先頭要素の値を取り出す
sealed class を使っているため、switch の各アームを埋め切らないとコンパイルエラーになります。新しい状態を 1 つ足したときに、どこで分岐漏れが起きているかを IDE がすぐ教えてくれる点が大きな利点です。
Widget を返す switch 式の読み方も同じです。
LoadingならローディングカードSuccessなら一覧Emptyなら 0 件専用カードUnauthorizedなら再ログイン導線NetworkErrorなら再試行付きエラーカード
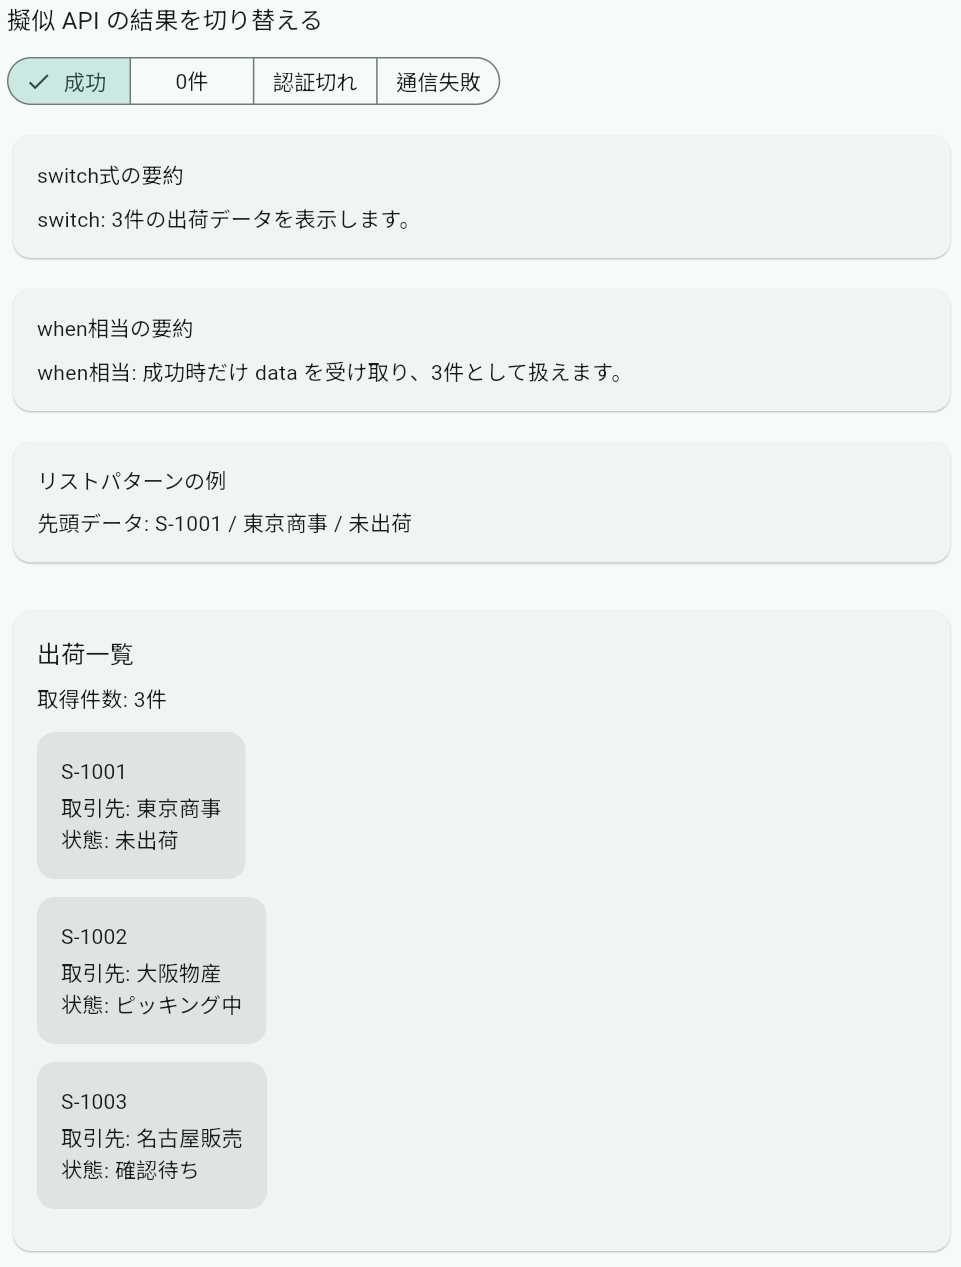
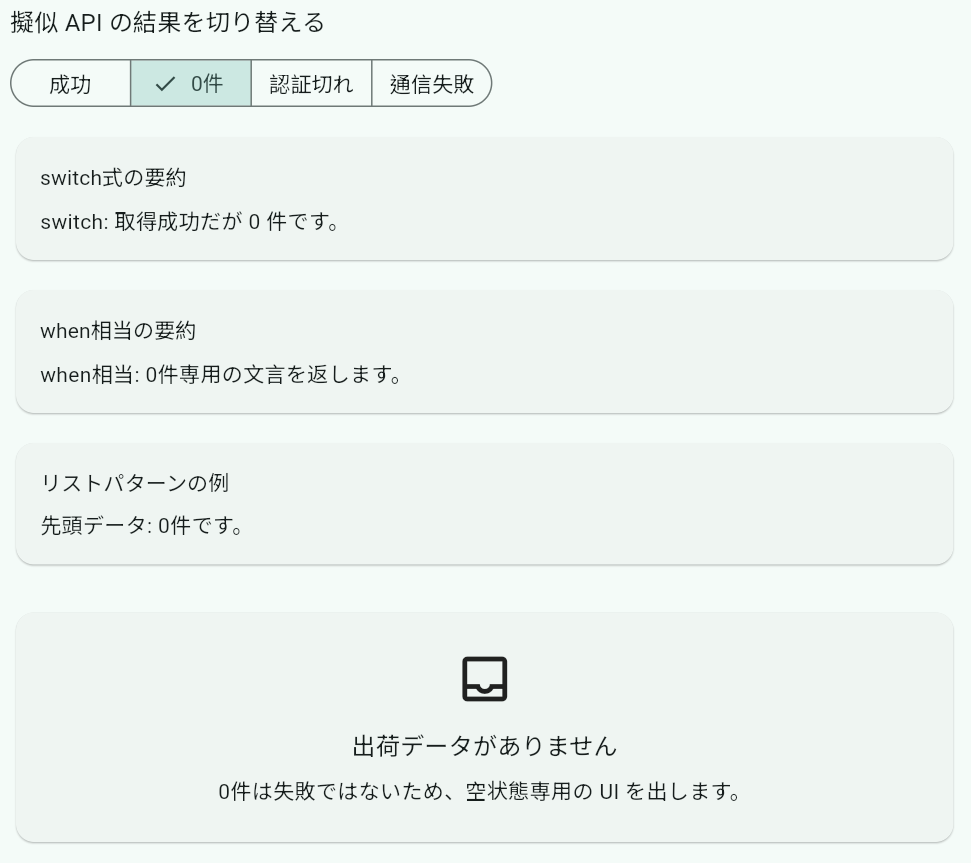
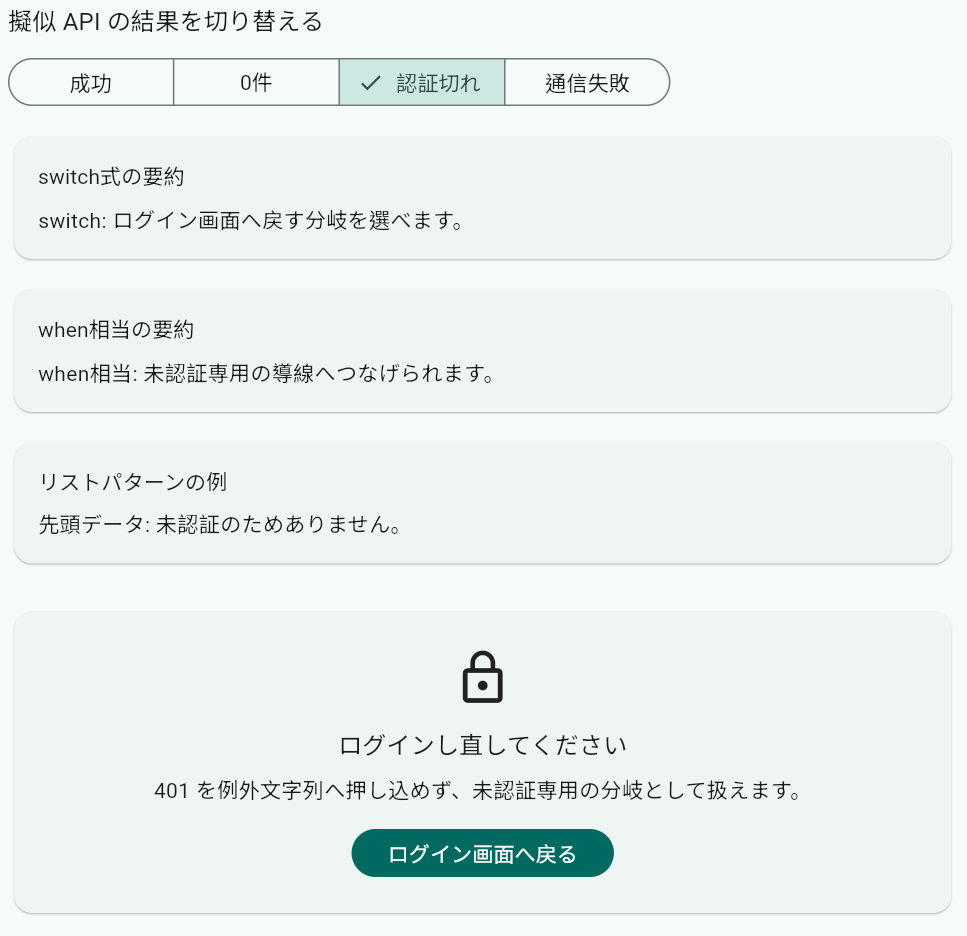
初回読み込みの Loading は一瞬で切り替わるため、ここでは見分けやすい 4 状態を載せます。要約カードと下部の結果ペインが、同じ ApiResult<T> に合わせて切り替わる点を見るのがコツです。
成功時は Success<List<Shipment>> から件数、要約、一覧の 3 か所をまとめて組み立てます。
0件時は失敗扱いにせず、Empty<List<Shipment>> 専用の空状態 UI を出します。
認証切れでは Unauthorized<List<Shipment>> に応じて、一覧の代わりに再ログイン導線を見せます。
通信失敗では NetworkError<List<Shipment>> の message を受け取り、要約カードと再試行ボタン付きのエラー UI へ流します。
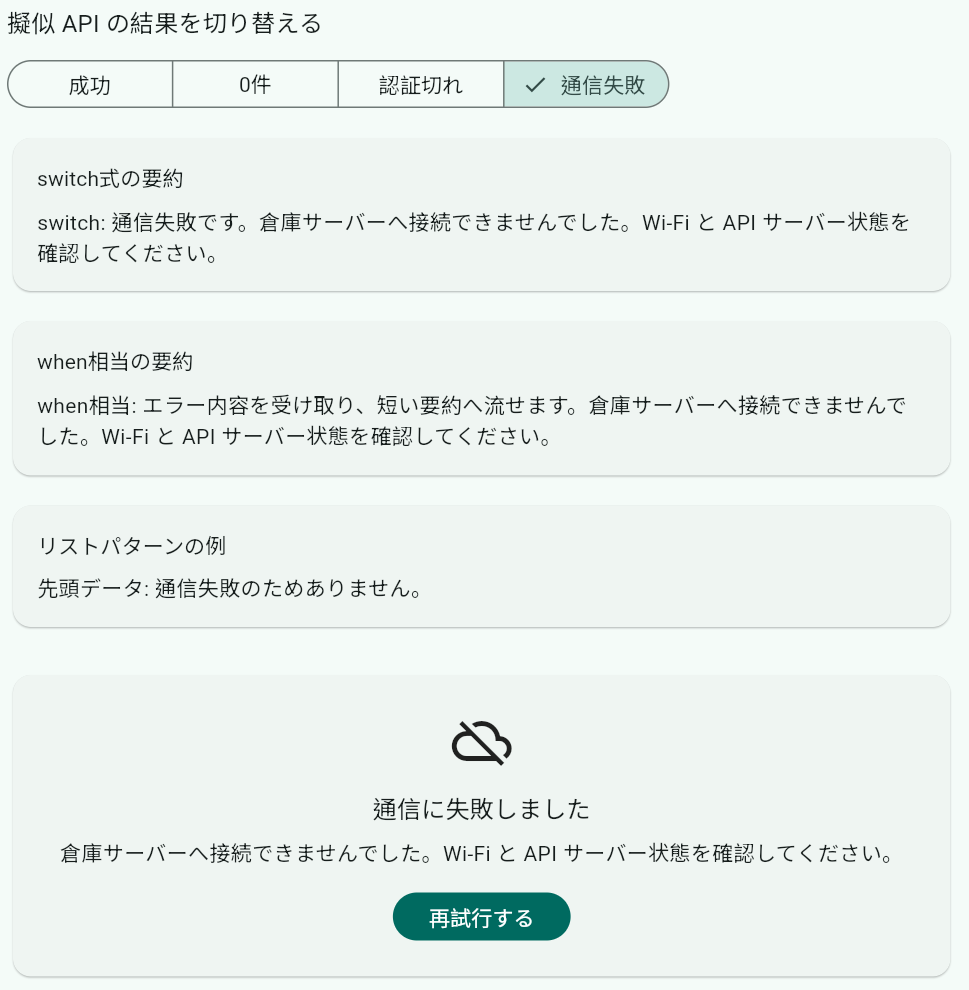
この形にしておくと、状態が増えたときも if の入れ子を増やさずに済みます。分岐の種類が UI と 1 対 1 に対応するので、レビュー時も確認しやすい構造です。
6. when 相当の書き方とどう使い分けるか
コード内では extension ApiResultWhen<T> として when 相当のヘルパーも入れています。これは freezed の when に近い書き味です。
| 書き方 | 向いている場面 | 特徴 |
|---|---|---|
switch 式 | 分岐そのものをその場で読みたいとき | 言語機能なので網羅性が見えやすい |
when 相当 | 要約文や値変換を短く書きたいとき | 呼び出し側が揃うが、実装は別場所へ移る |
今回のサンプルでは、Widget 分岐や件数サマリーは switch 式で書き、短い説明文は when 相当で返しています。この使い分けにすると、分岐ロジックの中心は switch に残しつつ、繰り返し書きたくない変換だけをヘルパーへ寄せられます。
when 相当を使う場合でも、実装の中身は結局 switch です。つまり Dart 3 では、when 専用の仕組みがなくても、sealed class と switch があれば同じ考え方を組み立てられます。
7. 既存記事とどうつなげるか
この書き方は、既存の Flutter 記事へ次のように持ち込めます。
- FlutterからREST APIを呼ぶ最小構成(JSON通信 + エラー処理)
statusCode == 401を単なる文字列エラーで返す代わりに、Unauthorizedとして分ける。
- Flutterでjson_serializable + build_runnerを使ってJSONモデルを型安全に扱う
Success<ShipmentPageResponse>のように、生成済みモデルをそのままSuccessに載せる。
- Flutterの状態管理入門(Riverpod最小構成)
- Provider が返す値を
ApiResult<T>にすると、UI 側のswitchの共通化がしやすい。
- Provider が返す値を
- Flutterでローディング・空状態・エラー表示を整える
AsyncValueは「まだ取得中か、例外で止まったか」を受け持ち、sealed classは「取得後の業務状態」を受け持つ。この切り分けがしやすい。
非同期状態と業務状態を 1 つの enum へ詰め込むより、段階ごとに型を分けたほうが分岐の責務がはっきりします。まずは今ある API 呼び出しの戻り値を 1 つ選び、sealed class と switch へ置き換えるところから始めると取り入れやすくなります。