FlutterのWidgetテスト入門(画面ロジックを壊さない最小構成) の次に整理しておきたいのが、画面遷移をまたぐ自動確認です。Flutterでログイン状態を保持する(JWT + secure storage 最小構成) まで進むと、入力、認証、一覧表示を毎回手でなぞる場面が増えます。Widget テストだけでは route 遷移と実行中の待機までは拾いにくいため、ここで Integration Test を 1 本入れておくと配布前チェックにつなげやすくなります。この記事では integration_test を使い、ログイン画面から出荷一覧画面へ進む最小シナリオを Android Emulator 上で確認します。
1. ゴールと非対象
対象読者
- Flutter プロジェクトを作成して
flutter runした経験がある人 - Widget テストは書いたが、画面遷移をまたぐ確認をどこから自動化するかまだ曖昧な人
- ログインから一覧表示までの最小シナリオを、納品前の回帰確認として先に固めたい人
この記事で到達する状態
integration_testを追加し、Android Emulator 上で Integration Test を実行できる- ログイン画面で入力し、一覧画面へ遷移する最小シナリオを自動確認できる
pumpとpumpAndSettleをどこで使い分けるか説明できる- 実 API に差し替える前に、テストアカウント、初期データ、待機条件の固定点を整理できる
非対象
- 実 API サーバーとの結合テスト
- カメラ、Bluetooth、secure storage など実機依存プラグインの確認
- iOS の Integration Test 実行
- Golden Test
- CI への組み込み
今回は「ログインして一覧画面へ進む」成功系 1 本に絞ります。失敗系や権限ダイアログまで同時に入れると、待機ポイントと確認対象が増え、Integration Test の入口としては重くなります。まずは route 遷移と読み込み完了を 1 本で安定させ、その後にケースを増やすほうが進めやすくなります。
2. 先に Integration Test の役割を整理する
Integration Test は、アプリを実際に起動し、入力、画面遷移、読み込み完了までを通しで確認するテストです。単体テストや Widget テストより遅くなりますが、画面をまたぐ最小シナリオを固定しやすくなります。
| 種類 | 主に確認するもの | 今回の扱い |
|---|---|---|
| 単体テスト | 純粋関数、変換、計算 | 今回は扱わない |
| Widget テスト | 1 画面の表示、ボタン押下、状態反映 | 前提記事として扱う |
| Integration Test | 入力、画面遷移、読み込み完了、実機相当の流れ | この記事の中心 |
今回の流れは次の通りです。
flowchart LR
  A[integration_test/app_test.dart] --> B[アプリ起動]
  B --> C[ログイン画面]
  C --> D[メールとパスワードを入力]
  D --> E[ログインボタンを押す]
  E --> F[DemoSessionRepository.login]
  F --> G[ShipmentListPage へ遷移]
  G --> H[DemoShipmentRepository.fetchShipments]
  H --> I[一覧表示]
  I --> J[件数と一覧項目を検証]
ここで見たい点は 3 つです。
- ログインボタン押下後に待機状態が出るか
- ログイン成功後に一覧画面へ遷移するか
- 一覧取得完了後に想定データが描画されるか
認証と一覧取得を fake repository に寄せているため、記事の焦点を「API の準備」ではなく「待機の置き方と画面遷移の確認」に絞れます。実 API へ差し替えるときの前提は、後半で別に整理します。
3. プロジェクトを作成して実行環境をそろえる
3-1. 環境構築がまだなら先に済ませる
環境構築がまだの場合は Windows 11で始めるFlutter開発環境 を先に参照してください。
3-2. Flutter プロジェクトを作成する
まずプロジェクトを作成します。
flutter create warehouse_integration_test
cd warehouse_integration_test
3-3. エミュレーターを起動する
次に、利用可能なエミュレーター一覧を確認します。
flutter emulators一覧に出た ID を指定して起動します。
flutter emulators --launch <emulator_id>3-4. pubspec.yaml に integration_test を追加する
今回は pub.dev の外部パッケージは増やしません。Integration Test 用の SDK package だけを dev_dependencies に追加します。pubspec.yaml の dev_dependencies: は次のように更新します。
dev_dependencies:
  flutter_test:
    sdk: flutter
  integration_test:
    sdk: flutter
  flutter_lints: ^5.0.0
追記したら依存関係を取得します。
flutter pub getintegration_test は Flutter SDK に含まれるため、別のバージョン指定や初期化ツールは不要です。まずはこれだけで、Android Emulator 向けの Integration Test を実行できます。
4. lib/main.dart を書き換える
lib/main.dart は次の内容に書き換えます。ログイン画面、一覧画面、認証と一覧取得の fake repository を 1 ファイルへまとめたサンプルです。待機中のインジケーターと Key を入れているため、Integration Test 側で状態を追いやすくなります。
この書き換えを行うと、flutter create 直後に入っている test/widget_test.dart は元のカウンターアプリ前提のままなので失敗します。この記事では Integration Test に絞って進めるため、test/widget_test.dart は削除してかまいません。
import 'package:flutter/material.dart';

const String demoEmail = 'worker@example.com';
const String demoPassword = 'pass1234';

void main() {
  runApp(const WarehouseApp());
}

class WarehouseApp extends StatelessWidget {
  const WarehouseApp({super.key});

  @override
  Widget build(BuildContext context) {
    return MaterialApp(
      title: 'Integration Test Sample',
      theme: ThemeData(
        colorScheme: ColorScheme.fromSeed(seedColor: Colors.teal),
      ),
      home: LoginPage(
        sessionRepository: const DemoSessionRepository(),
        shipmentRepository: const DemoShipmentRepository(),
      ),
    );
  }
}

class AuthException implements Exception {
  const AuthException(this.message);

  final String message;

  @override
  String toString() => message;
}

class Shipment {
  const Shipment({
    required this.code,
    required this.customer,
    required this.status,
  });

  final String code;
  final String customer;
  final String status;
}

abstract class SessionRepository {
  Future<String> login({
    required String email,
    required String password,
  });
}

class DemoSessionRepository implements SessionRepository {
  const DemoSessionRepository();

  @override
  Future<String> login({
    required String email,
    required String password,
  }) async {
    await Future<void>.delayed(const Duration(milliseconds: 600));

    if (email != demoEmail || password != demoPassword) {
      throw const AuthException('メールアドレスまたはパスワードが違います。');
    }

    return 'demo-token';
  }
}

abstract class ShipmentRepository {
  Future<List<Shipment>> fetchShipments({required String token});
}

class DemoShipmentRepository implements ShipmentRepository {
  const DemoShipmentRepository();

  @override
  Future<List<Shipment>> fetchShipments({required String token}) async {
    await Future<void>.delayed(const Duration(milliseconds: 500));

    if (token.isEmpty) {
      throw const AuthException('セッションがありません。');
    }

    return const <Shipment>[
      Shipment(
        code: 'S-1001',
        customer: '東京商事',
        status: 'ピッキング中',
      ),
      Shipment(
        code: 'S-1002',
        customer: '大阪物産',
        status: '確認待ち',
      ),
      Shipment(
        code: 'S-1003',
        customer: '名古屋販売',
        status: '出荷準備完了',
      ),
    ];
  }
}

class LoginPage extends StatefulWidget {
  const LoginPage({
    super.key,
    required this.sessionRepository,
    required this.shipmentRepository,
  });

  final SessionRepository sessionRepository;
  final ShipmentRepository shipmentRepository;

  @override
  State<LoginPage> createState() => _LoginPageState();
}

class _LoginPageState extends State<LoginPage> {
  final GlobalKey<FormState> _formKey = GlobalKey<FormState>();
  final TextEditingController _emailController = TextEditingController();
  final TextEditingController _passwordController = TextEditingController();

  bool _submitting = false;
  String? _errorMessage;

  @override
  void dispose() {
    _emailController.dispose();
    _passwordController.dispose();
    super.dispose();
  }

  Future<void> _submit() async {
    final FormState? formState = _formKey.currentState;
    if (formState == null || !formState.validate()) {
      return;
    }

    setState(() {
      _submitting = true;
      _errorMessage = null;
    });

    try {
      final String token = await widget.sessionRepository.login(
        email: _emailController.text.trim(),
        password: _passwordController.text,
      );

      if (!mounted) {
        return;
      }

      Navigator.of(context).pushReplacement(
        MaterialPageRoute<void>(
          builder: (BuildContext context) {
            return ShipmentListPage(
              token: token,
              shipmentRepository: widget.shipmentRepository,
            );
          },
        ),
      );
    } on AuthException catch (error) {
      if (!mounted) {
        return;
      }

      setState(() {
        _errorMessage = error.message;
      });
    } finally {
      if (mounted) {
        setState(() {
          _submitting = false;
        });
      }
    }
  }

  @override
  Widget build(BuildContext context) {
    return Scaffold(
      appBar: AppBar(
        title: const Text('Integration Testで確認するログイン'),
      ),
      body: ListView(
        padding: const EdgeInsets.all(24),
        children: <Widget>[
          Card(
            child: Padding(
              padding: const EdgeInsets.all(20),
              child: Column(
                crossAxisAlignment: CrossAxisAlignment.start,
                children: const <Widget>[
                  Text(
                    'ログインから一覧表示までを通して確認します。',
                    style: TextStyle(
                      fontSize: 18,
                      fontWeight: FontWeight.bold,
                    ),
                  ),
                  SizedBox(height: 8),
                  Text('メール: worker@example.com'),
                  Text('パスワード: pass1234'),
                ],
              ),
            ),
          ),
          const SizedBox(height: 24),
          Form(
            key: _formKey,
            child: Column(
              children: <Widget>[
                TextFormField(
                  key: const Key('email-field'),
                  controller: _emailController,
                  keyboardType: TextInputType.emailAddress,
                  decoration: const InputDecoration(
                    labelText: 'メールアドレス',
                    border: OutlineInputBorder(),
                  ),
                  validator: (String? value) {
                    final String email = value?.trim() ?? '';
                    if (email.isEmpty) {
                      return 'メールアドレスを入力してください。';
                    }
                    if (!email.contains('@')) {
                      return 'メールアドレスの形式を確認してください。';
                    }
                    return null;
                  },
                ),
                const SizedBox(height: 16),
                TextFormField(
                  key: const Key('password-field'),
                  controller: _passwordController,
                  obscureText: true,
                  decoration: const InputDecoration(
                    labelText: 'パスワード',
                    border: OutlineInputBorder(),
                  ),
                  validator: (String? value) {
                    if ((value ?? '').isEmpty) {
                      return 'パスワードを入力してください。';
                    }
                    return null;
                  },
                ),
                const SizedBox(height: 16),
                if (_errorMessage != null)
                  Padding(
                    padding: const EdgeInsets.only(bottom: 12),
                    child: Text(
                      _errorMessage!,
                      key: const Key('login-error'),
                      style: TextStyle(
                        color: Theme.of(context).colorScheme.error,
                      ),
                    ),
                  ),
                SizedBox(
                  width: double.infinity,
                  child: FilledButton(
                    key: const Key('login-button'),
                    onPressed: _submitting ? null : _submit,
                    child: const Text('ログインして一覧を開く'),
                  ),
                ),
                const SizedBox(height: 16),
                if (_submitting)
                  const Row(
                    mainAxisAlignment: MainAxisAlignment.center,
                    children: <Widget>[
                      SizedBox(
                        width: 20,
                        height: 20,
                        child: CircularProgressIndicator(
                          key: Key('login-progress'),
                          strokeWidth: 2.5,
                        ),
                      ),
                      SizedBox(width: 12),
                      Text('ログイン中です。'),
                    ],
                  ),
              ],
            ),
          ),
        ],
      ),
    );
  }
}

class ShipmentListPage extends StatefulWidget {
  const ShipmentListPage({
    super.key,
    required this.token,
    required this.shipmentRepository,
  });

  final String token;
  final ShipmentRepository shipmentRepository;

  @override
  State<ShipmentListPage> createState() => _ShipmentListPageState();
}

class _ShipmentListPageState extends State<ShipmentListPage> {
  late Future<List<Shipment>> _shipmentsFuture;

  @override
  void initState() {
    super.initState();
    _shipmentsFuture = _loadShipments();
  }

  Future<List<Shipment>> _loadShipments() {
    return widget.shipmentRepository.fetchShipments(token: widget.token);
  }

  void _reload() {
    setState(() {
      _shipmentsFuture = _loadShipments();
    });
  }

  @override
  Widget build(BuildContext context) {
    return Scaffold(
      appBar: AppBar(
        title: const Text('出荷一覧'),
        actions: <Widget>[
          IconButton(
            key: const Key('refresh-button'),
            onPressed: _reload,
            icon: const Icon(Icons.refresh),
          ),
        ],
      ),
      body: FutureBuilder<List<Shipment>>(
        future: _shipmentsFuture,
        builder: (BuildContext context, AsyncSnapshot<List<Shipment>> snapshot) {
          if (snapshot.connectionState != ConnectionState.done) {
            return const Center(
              child: Column(
                mainAxisSize: MainAxisSize.min,
                children: <Widget>[
                  CircularProgressIndicator(key: Key('shipment-loading')),
                  SizedBox(height: 12),
                  Text('出荷一覧を読み込み中です。'),
                ],
              ),
            );
          }

          if (snapshot.hasError) {
            return Center(
              child: Padding(
                padding: const EdgeInsets.all(24),
                child: Text(
                  '一覧取得に失敗しました。${snapshot.error}',
                  key: const Key('shipment-error'),
                ),
              ),
            );
          }

          final List<Shipment> shipments = snapshot.data ?? const <Shipment>[];

          return ListView(
            padding: const EdgeInsets.all(24),
            children: <Widget>[
              Card(
                child: Padding(
                  padding: const EdgeInsets.all(20),
                  child: Column(
                    crossAxisAlignment: CrossAxisAlignment.start,
                    children: <Widget>[
                      Text(
                        'ログイン成功後の一覧確認',
                        style: Theme.of(context).textTheme.titleMedium,
                      ),
                      const SizedBox(height: 8),
                      const Text(
                        'ログインから一覧表示まで通せると、画面遷移をまたぐ最小シナリオを固定できます。',
                      ),
                      const SizedBox(height: 12),
                      Text(
                        '${shipments.length}件の出荷待ち',
                        key: const Key('shipment-summary'),
                        style: Theme.of(context).textTheme.headlineSmall,
                      ),
                    ],
                  ),
                ),
              ),
              const SizedBox(height: 16),
              for (final Shipment shipment in shipments)
                Padding(
                  padding: const EdgeInsets.only(bottom: 12),
                  child: Card(
                    key: Key('shipment-card-${shipment.code}'),
                    child: ListTile(
                      title: Text(shipment.code),
                      subtitle: Text('${shipment.customer} / ${shipment.status}'),
                    ),
                  ),
                ),
            ],
          );
        },
      ),
    );
  }
}
コードのポイント
① 認証と一覧取得を fake repository に寄せる
class DemoSessionRepository implements SessionRepository {
  const DemoSessionRepository();

  @override
  Future<String> login({
    required String email,
    required String password,
  }) async {
    await Future<void>.delayed(const Duration(milliseconds: 600));

    if (email != demoEmail || password != demoPassword) {
      throw const AuthException('メールアドレスまたはパスワードが違います。');
    }

    return 'demo-token';
  }
}
実 API を呼ばずに待機状態だけ再現しているため、Integration Test の入口でつまずきやすい「待ち時間の扱い」と「画面遷移の確認」に集中できます。HTTP の前提は 8 章で別に整理します。
② ログイン中と一覧読み込み中を画面に出す
if (_submitting)
  const Row(
    mainAxisAlignment: MainAxisAlignment.center,
    children: <Widget>[
      SizedBox(
        width: 20,
        height: 20,
        child: CircularProgressIndicator(
          key: Key('login-progress'),
          strokeWidth: 2.5,
        ),
      ),
      SizedBox(width: 12),
      Text('ログイン中です。'),
    ],
  ),
待機中の UI を出しておくと、Integration Test 側で「押した直後」と「処理完了後」を分けて確認できます。裏で静かに待つ実装だと、どこで pump すべきかが見えにくくなります。
③ 一覧項目へ Key を付けて到達点を明確にする
for (final Shipment shipment in shipments)
  Padding(
    padding: const EdgeInsets.only(bottom: 12),
    child: Card(
      key: Key('shipment-card-${shipment.code}'),
      child: ListTile(
        title: Text(shipment.code),
        subtitle: Text('${shipment.customer} / ${shipment.status}'),
      ),
    ),
  ),
一覧到達後に何を見つければ成功なのかを Key とテキストで揃えておくと、後から空一覧やエラー表示のケースを追加しやすくなります。Integration Test は到達点を曖昧にすると壊れやすくなるため、最初から判定しやすい印を置いておくほうが安全です。
5. flutter run でシナリオを手で確認する
Integration Test を書く前に、まずはサンプル画面を 1 回手で通します。プロジェクト直下で次のコマンドを実行します。
flutter run起動後は次の順で確認します。
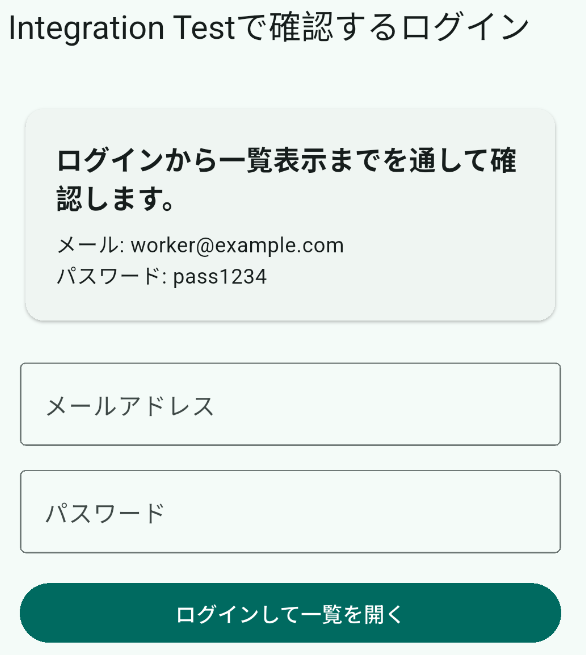
- ログイン画面に
worker@example.com/pass1234の案内が表示されている - 入力してログインボタンを押すと、
ログイン中です。が一瞬表示される - 一覧画面へ遷移し、
S-1001S-1002S-1003が見える
ログイン画面は次のように表示されます。
一覧画面へ進むと、次の状態になります。
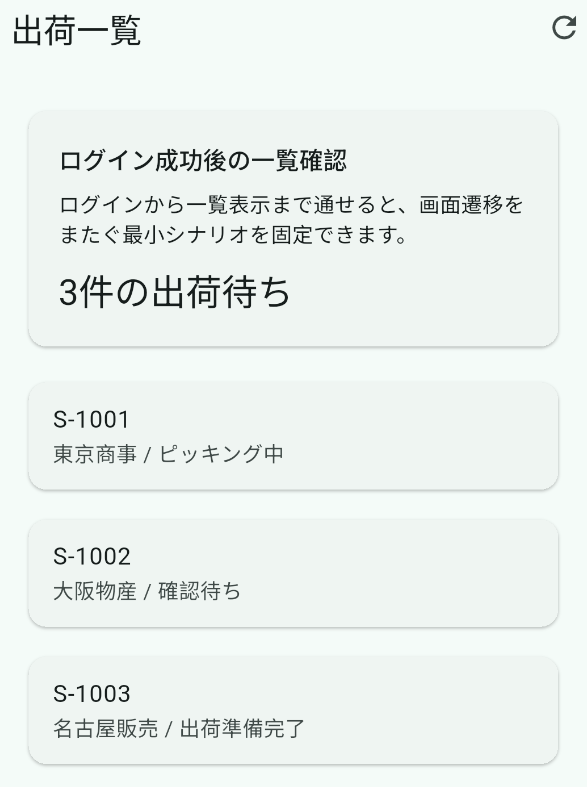
自動テストの前に 1 回手で通しておくと、「アプリ側の実装がまだ壊れている」のか「Integration Test 側の待機が足りない」のかを切り分けやすくなります。待機ポイントを画面で見ておくことも、Integration Test を安定させる下準備になります。
6. integration_test/app_test.dart を作成する
integration_test ディレクトリを作成し、integration_test/app_test.dart は次の内容で作成します。
このテストでは、アプリ起動から一覧表示確認までを 1 本で通します。押した直後と完了後を分けて確認するため、途中でログイン中インジケーターも検証します。
import 'package:flutter/material.dart';
import 'package:flutter_test/flutter_test.dart';
import 'package:integration_test/integration_test.dart';

import 'package:warehouse_integration_test/main.dart' as app;

void main() {
  IntegrationTestWidgetsFlutterBinding.ensureInitialized();

  testWidgets('有効な認証情報でログインし、一覧表示まで進める', (
    WidgetTester tester,
  ) async {
    app.main();
    await tester.pumpAndSettle();

    expect(find.text('Integration Testで確認するログイン'), findsOneWidget);

    await tester.enterText(
      find.byKey(const Key('email-field')),
      app.demoEmail,
    );
    await tester.enterText(
      find.byKey(const Key('password-field')),
      app.demoPassword,
    );

    await tester.tap(find.byKey(const Key('login-button')));
    await tester.pump();

    expect(find.byKey(const Key('login-progress')), findsOneWidget);

    await tester.pump(const Duration(milliseconds: 700));
    await tester.pumpAndSettle();

    expect(find.text('Integration Testで確認するログイン'), findsNothing);
    expect(find.text('出荷一覧'), findsOneWidget);
    expect(find.byKey(const Key('shipment-summary')), findsOneWidget);
    expect(find.text('S-1001'), findsOneWidget);
    expect(find.text('S-1003'), findsOneWidget);
    expect(find.byKey(const Key('shipment-loading')), findsNothing);
  });
}
コードのポイント
① 先頭で IntegrationTestWidgetsFlutterBinding を初期化する
void main() {
  IntegrationTestWidgetsFlutterBinding.ensureInitialized();

  testWidgets('有効な認証情報でログインし、一覧表示まで進める', (
    WidgetTester tester,
  ) async {
これを入れずに integration_test 配下のテストを実行すると、実機相当の実行基盤が初期化されません。Integration Test を追加したら、まずここが入っているか確認します。
② ボタン押下直後は pump() で待機開始だけ確認する
await tester.tap(find.byKey(const Key('login-button')));
await tester.pump();

expect(find.byKey(const Key('login-progress')), findsOneWidget);
押した直後に 1 フレーム進めることで、ローディング表示へ切り替わったかを確認できます。ここを pumpAndSettle() だけにすると、途中状態を見ずに結果だけ確認する形になり、待機不足を見逃しやすくなります。
③ 処理完了後は pumpAndSettle() で遷移と描画を待つ
await tester.pump(const Duration(milliseconds: 700));
await tester.pumpAndSettle();
このサンプルではログイン処理に 600ms の待機を入れているため、まず時間を進めてから pumpAndSettle() で route 遷移と一覧描画を待っています。固定待機を 0 に近づけたい場合は、画面側の状態変化をさらに細かく表に出す方法もあります。
7. エミュレーターで Integration Test を実行する
まず接続中のデバイスを確認します。
flutter devices表示された device id を使って、次のコマンドを実行します。
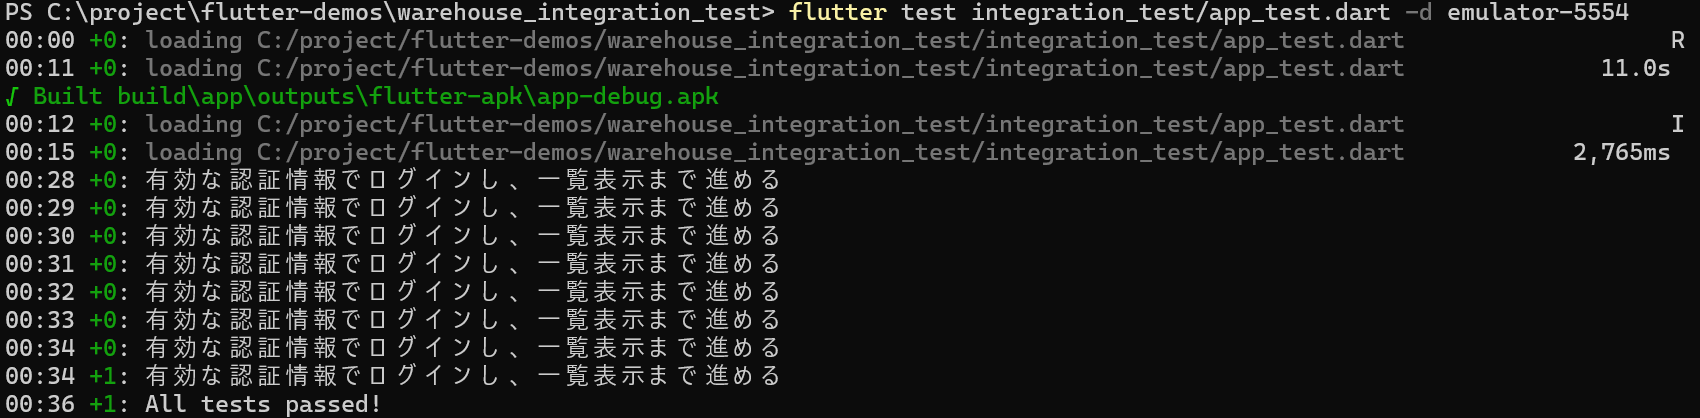
flutter test integration_test/app_test.dart -d <device_id>成功すると、00:xx +1: All tests passed! のような出力が表示されます。
実行例は次の通りです。
失敗したときに最初に見る場所は次の 3 つです。
- アプリ側で
Key名を変えていないか pumpとpumpAndSettleの順番が、待機中 UI と遷移完了 UI に対応しているか- エミュレーターが起動済みで、
flutter devicesに見えているか
Integration Test は Widget テストより失敗原因が広がります。画面遷移、待機、デバイス接続のどこで止まったかを順に切ると原因を追いやすくなります。
8. 実 API に置き換える前に前提を固定する
今回のサンプルは fake repository ですが、実 API に差し替える前に固定しておきたい点はあります。Integration Test では「アプリ側の不具合」と「テスト用データの揺れ」を分けることが重要です。
| 項目 | 今回のサンプル | 実 API で先に固定したいこと |
|---|---|---|
| 認証情報 | worker@example.com / pass1234 | 毎回同じ結果になるテストアカウント |
| 一覧データ | fake repository の 3 件固定 | seed データ、fixture、またはテスト専用 API |
| 待機時間 | Future.delayed で 600ms / 500ms | タイムアウト値、リトライ有無、ローディング表示 |
| 副作用 | なし | 破壊的更新を避けるか、後片付け手順を用意する |
Android Emulator からローカル API を叩く場合は、URL も先に固定しておきます。
- Android Emulator:
http://10.0.2.2:<port> - Windows デスクトップ実行:
http://127.0.0.1:<port>
実 API を使う段階で確認したい点は次の通りです。
- ログイン成功時に返るレスポンスが、毎回同じキー構成か
- 一覧データがテスト実行のたびに増減しないか
- タイムアウトやリトライが、テストを不安定にしていないか
- OTP、生体認証、プッシュ通知など端末依存の要素を同じシナリオへ入れすぎていないか
Integration Test に実 API まで同時に背負わせると、落ちたときに原因が分散します。まずは固定しやすい成功系から始め、API 結合は前提条件を固めたうえで段階的に足すほうが安全です。
9. どこまで自動化するか線引きする
Integration Test へ何でも寄せると、実行時間と不安定さが増えます。役割を分けたうえで最小本数から始めるほうが保守しやすくなります。
| 置き場 | 向いているもの | この題材の例 |
|---|---|---|
| Widget テスト | 1 画面の表示、入力バリデーション、ボタン活性状態 | メール未入力でエラーが出るか |
| Integration Test | 入力から画面遷移、読み込み完了までの通し確認 | ログインして出荷一覧が 3 件表示されるか |
| 手動確認 | 権限ダイアログ、カメラ、通知、端末設定依存 | 実機の通知許可、社内配布 APK のインストール確認 |
最初の 1 本としては、今回のように「ログインから一覧表示まで」を選ぶと守備範囲が明確です。成功系を 1 本通したあとで、認証失敗、空一覧、再試行、実 API 結合を増やしていくと段階的に広げられます。
10. まとめ
Integration Test の入口では、ログイン、待機、画面遷移、一覧表示までを 1 本で通せる状態を先に作ると整理しやすくなります。待機中の UI と到達点の Key を先に置いておけば、テストコード側の pump 位置も決めやすくなります。まずは FlutterのWidgetテスト入門(画面ロジックを壊さない最小構成) と役割を分けて使い、認証の背景は Flutterでログイン状態を保持する(JWT + secure storage 最小構成) と合わせて整理すると流れがつながります。